


4
VI. OPTION ITEMS
1. Wall Mount Kit
2. Integrated MSR: ISO 2 or 3 track or JIS II with PS/2 interface
3. RS232 interface touch controller for TM4012E or TM4015E only.
(PS/2 interface controller will be hereby deleted for this option)
4. USB hub (1 up 3 down)
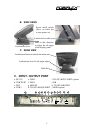
VII. INSTALLATION
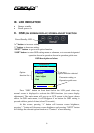
1. For best cable routing effect, please do next step to place all required cables
into the cable passage in the stand assembly.
2. Press down the lock/release button on stand assembly when lifting the main
unit to separate main unit from the stand. Route all cables to be connected to
PC or other device through the cable exit in stand assembly. (Open the metal
plate first if necessary.) Make all the monitor end of cables to come out of
the stand assembly like the right picture below.
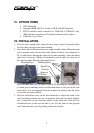
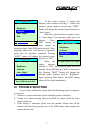
Hook the main unit back on stand assembly by matching the matching pegs
to round part of matching holes and slide them down to slot part till the rear
latch clicks. It is recommended that the terminal be hooked onto the lower
set of holes for better stability.
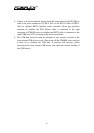
3. Push the lock/release lever on the base backward to adjust the stand to the
most horizontal position for ease of operation. Insert the tip of the latchkey
into a latch hole on one side near bottom of the main unit. Turn this key
counterclockwise to the end and take it out. Do the same on the opposite
side. Open the cable cover by pulling at the removal hole.
Matching HolesMatching Pegs
Round Part
Slot Part
Removal
Hollow