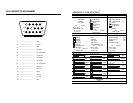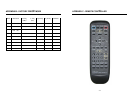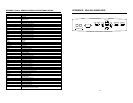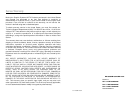
INSTALLATION (Refer to REAR CONNECTORS on page 13)
Precautions:
The Princeton Graphics T-Series should be placed at least six (6) inches from the wall.
Television:
1. Install cable from antenna or cable TV to the “F” connector labeled “ANT IN”.
2. Push the monitor main power switch on, the Red LED Indicator should be on.
This indicates that the T is in STAND BY mode.
3. Press the Power button on the Remote control, the Red indicator should turn
green.
4. Using the Remote control press the TV/PC/AV button until the T displays
TV-MAIN NTSC.
5. Using the Remote control press the TV/CATV. Select TV if you are using an
antenna. Select CATV if you are using a cable service.
6. Using the Remote control press the AUTO button, the T will now preset all
active channels into memory.
7. There are two methods of selecting a channel:
a. Press CH ∆/∇ on the Remote control or the front panel to step through
the channels.
b. Press the numeric keys of the channel desired.
8. Press the Vol up/down on the Remote control or the front panel to adjust the
volume.
Video Recorder: (VCR)
1. If you are using the F Connector to connect the signal, follow the instructions
for television setup, connecting the antenna or cable to the ANT IN on the
VCR, and connect a coax patch cable from the ANT OUT of the VCR to the
F connector on the T. Select channel 3 on the T per step 7 above, and set the
VCR/TV selector on the VCR to “VCR”. Press PLAY on the VCR.
2. If using the Video (Composite) output from the VCR, connect the Video
output,Left and Right Audio outputs of the VCR to the Video Composite,
Audio Left and Audio Right inputs on the T.
3. Using the Remote control press the “TV/PC/AV” key until NTSC VIDEO
appears on the screen.
4. Press PLAY on the VCR.
5. If using the S-Video output of the VCR, connect the S-Video output, Left and
Right Audio output of the VCR to the S-Video Audio Left and Audio Right
inputs for S-Video signal on the T.
6. Using the Remote control press the “TV/PC/AV” key until NTSC S-VHS
appears on the screen.
7. Press PLAY on the VCR.
6
DVD player:
1 If using the Video (Composite) output from the DVD, connect the Video output, Left
and Right Audio outputs of the DVD to the Video Composite, Audio Left and Audio
Right inputs on the T.
2. Using the Remote control press the VIDEOinput key or “TV/PC/AV” key until NTSC
VIDEO appears on the screen.
3. Start the DVD player.
4. If using the S-Video output of the DVD, connect the S-Video output, Left and Right
Audio output of the DVD to the S-Video Audio Left and Audio Right inputs for S-
Video signal on the T..
5. Using the Remote control press the S-VIDEO input key or “TV/PC/AV” key until
NTSC S-VHS appears on the screen.
6. Start the DVD player.
Computer:
1. Connect the computer to the monitor using VGA1 located on the rear panel or VGA2
located on the front panel.
2. Connect the Audio to the appropriate audio connectors next to the VGA connector
being used. Boot the computer so that video will be present. Without video present,
the T will enter the DPMS (power management “sleep” mode within three seconds. If
this occurs, press the power button on the remote or the front panel. Make certain a
signal is being output from the computer device. (refer to Page 2)
3. Using the Remote control press the VGA1 or VGA2 key or “TV/PC/AV” key until
VGA1 or VGA2 appears on the screen. If an image does not appear, press the
VGA1/VGA2 button on the remote or the front panel.
4. If the T still has no display check your video card resolution and refresh settings with
Appendix B.
Because standard desktop computer displays operate at higher frequencies, it is
possible to overdrive the T. You may need to connect the computer back to a desktop
monitor and reset the resolution and refresh rate according to the parameters in
Appendix B.
High Definition Receiver:
1. Connect a Receiver to the monitor using the VGA1 located on the rear panel or VGA2
located on the front panel.
2. Connect the Audio to the appropriate audio connectors next to the VGA connector in
use.
3. Using the Remote control press the VGA1 or VGA2 key or “TV/PC/AV” key until
VGA1 or VGA2 appears on the screen, if using VGA to input the HDTV signal.
4. Press MENU, then VOL+ while the PICTURE function is highlighted on the On
Screen Menu.
5.
Press SEL- to highlight V-SIZE, then press VOL+ to select that function.
6. Press VOL- to reduce the height of the display to 12”(307mm) for DM-5948S; 14.3”
(364mm) for DM-6952S or 16.3”(414mm) for DM-7752S.
Setting the Aspect Ratio:
Some HD receivers (RCA DTC-100 for example) feature a user-defined full-screen or
letterbox output mode for 4:3 aspect ratio monitors. Please refer to your HD receiver
manual for details. If your receiver does not have this function, follow the instructions in
steps 4-6 above to adjust the image for a 16:9 aspect ratio within the 4:3 aspect ratio T
display area.
7


