


1
Quick Start Guide
Installation Instructions
Congratulations on your purchase of the SANbox® 1400 Series Fibre Channel switch. This Quick Start Guide describes
the simple steps to install and activate your new switch using a Windows® workstation. For advanced options and
instructions (including Solaris®, Linux®, and MacOS X® installations), refer to the SANbox 1400 Series Fibre Channel
Switch Installation Guide on the CD provided with the switch.
If you would prefer to view this quick start guide in your native language, you can find the following translations on the
CD provided with the switch: Chinese, French, German, Italian, Japanese, Korean, Portuguese, and Spanish.
NOTE: Do not connect and apply power to the switch until instructed in Step 4
Step 1. Verify the Package Contents
The SANbox 1400 Series Fibre Channel Switch is shipped with the following items:
1 SANbox 1400 Series Fibre Channel Switch
1 External DC power supply
1 AC Power cord
4 Rubber feet
1CD
NOTE: Small Form-factor Pluggable (SFP) transceivers are included with some models. The rail kit, if you ordered
one, is packaged separately.
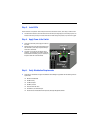
Step 2. Mount the Switch
You can mount the SANbox 1400 Series switch on a flat surface or in a rack.
❑ For a surface mount, attach the rubber feet to the locations on the bottom of the switch.
❑ For a rack mount, install the SANbox 1400 Series rail kit in a standard 19" rack as described in the SANbox 1400
Series Fibre Channel Switch Rack Mounting Guide that is packaged with the rail kit.