


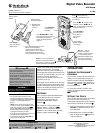

2
3. Press
SET/DISP. The minute digits flash.
4. Repeatedly press or hold down
VOL+/
VOL–
to adjust the minute.
5. Press
SET/DISP. The year flashes.
6. Repeatedly press or hold down
VOL+/
VOL–
to adjust the year.
7. Press
SET/DISP. The month flashes.
8. Repeatedly press or hold down
VOL+/
VOL–
to adjust the month.
9. Press
SET/DISP. The day flashes.
10. Repeatedly press or hold down
VOL+/
VOL–
to adjust the day.
11. Press
SET/DISP to resume normal
operation.
SETTING THE ALARM
You can set an alarm to sound every day at
apresettime.Ô
1. Press
MODE/INDEX in clock mode to
display the alarm time.
ALARM appears.
2. Press and hold
SET/DISP in alarm clock
mode for about two seconds. The hour
digits flash.
3. Repeatedly press or hold down
VOL+/
VOL–
to enter the hour. PM appears to
indicate a PM hour.
4. Press
SET/DISP. The minute digits flash.
5. Repeatedly press or hold down
VOL+/
VOL–
to enter the minute.
6. Press
SET/DISP to store the setting. 3
appears . When you set the alarm time,
the alarm automatically turns on.
TURNING ALARM ON/OFF
1. Press MODE/INDEX in clock mode to
display the alarm time.
ALARM
appears. Ô
2. Repeatedly press
VOL+/VOL– to turn
alarm on or off. 3 appears when the
alarm is turned on.
At the set alarm time, the alarm sounds for
about 30 seconds and 3 flashes. To silence
the alarm sooner, press any button.
RECORDER MODE
OPERATIONS
The recorder is preset to the clock mode
when you install the batteries. To turn on the
recorder mode, press
REC/STOP or
. If you press REC/STOP to enter
the recorder mode, the recorder starts to
record a new message. The selected folder,
message information and the status of
various settings appear. Ô
You can select a folder, select a recording
mode, set the microphone sensitivity, enable
or disable voice-activated recording (VOX),
and, set the key tone to on or off at any time.
See “Programming the Recorder”.
Information about the recorder’s status
appears when the recorder mode is on.
• The selected recording mode (
SP, EP or
LP) appears.
• The selected folder,
x or y,
appears.
• The two-digit index number of the
message and the total number of the
messages appear in the top of display.
(
01/06 indicates messages one of six,
with 1 being the current message
number and 6 being the total number of
the messages.)
• The battery status appears.
• The duration of the selected message
appears near the bottom of the display.
H represents hours and M represents
minutes.
To conserve battery power, the recorder
returns to time mode automatically if you do
not press a button (when the recorder stops)
for about 30 seconds. To return to time
mode sooner, press
MODE/INDEX.
PROGRAMMING THE
RECORDER
There are 5 options you can set: the active
folder, recording mode, MIC sensitivity,
voice activated recording (VOX) on/off, and
button press confirmation tone on/off. Ô
1. In recorder mode, hold down
SET/DISP
until FILE appears and either x or y
flashes. Up to 99 messages are
available in each folder.
2. Repeatedly press
VOL+/VOL– to select
theactivefolder
x or y.
3. Press
SET/DISP when the desired folder
flashes to confirm it.
MODE appears and
either
SP, EP or LP flashes.
4. Repeatedly press
VOL+/VOL– to set the
recording mode (
SP, EP or LP). Recording
time and quality differs in each mode.
• Upto51minutesin
SP (standard
play) mode may be recorded.
• Upto68minutesin
EP (extended
play) mode may be recorded.
• Upto90minutesin
LP (long play)
mode may be recorded.
5. Press
SET/DISP when the desired
recording mode flashes to confirm it.
MIC appears and either Auto, Hi or Lo
flashes.
6. Repeatedly press
VOL+/VOL– to set
microphone sensitivity (
Auto, Hi or Lo).
When
Auto (automatic) is selected, the
sensitivity of the microphone adjusts
automatically. Although we recommend
Ô NOTE Ô
Setting the Alarm
If you do not press a button for more than 30
seconds, the time display returns.
Turning the Alarm ON/OFF
If the recorder is in recorder mode at preset
alarm time, the alarm does not sound even
when alarm is set to on.
3 flashes for about
30 seconds. To stop
3 from flashing, press
any button.
Recorder Mode Operations
• LOCK mustbesettoinactivetoturnonthe
recorder mode. If LOCK is set to active and
you press REC/ON,and
LOCK flashes and
the recorder remains in time mode. Slide
LOCK in the opposite of the direction of the
arrow and try again. See “Locking the
Recorder’s Controls”.
• The recorder is not preset to use voice-
activated recording (see “Voice Activated”.
The recorder is preset to select Folder A
(see “Programming the Recorder”).
Programming the Recorder
• You cannot program the recorder while
recording or playing back messages.
• If you do not press a button for more than 30
seconds, the time display returns.
Listening Safely
To protect your hearing, follow these guidelines
when you use earphones.
• Set the volume to the lowest setting before
you begin listening. After you begin listening,
adjust the volume to a comfortable level.
• Do not listen at extremely high volume levels.
Extended high-volume listening can lead to
permanent hearing loss.
• Once you set the volume, do not increase it.
Over time, your ears adapt to the volume
level, so a volume level that does not cause
discomfort might still damage your hearing.
Traffic Safety
• Do not wear earphones while operating a
motor vehicle or riding a bicycle. This can
createatraffichazardandcouldbeillegalin
some areas.
• Even though some earphones let you hear
some outside sounds when listening at
normal volume levels, they still can present a
traffic hazard.
Care
Keep the recorder dry; if it gets wet, wipe it dry
immediately. Use and store the recorder only in
normal temperature environments. Handle the
recorder carefully; do not drop it. Keep the
recorder away from dust and dirt, and wipe it
with a damp cloth occasionally to keep it looking
new.
If your recorder is not performing as it should,
take it to your local RadioShack store for
assistance. Modifying or tampering with the
recorder’s internal components can cause a
malfunction and might invalidate its warranty
and void your FCC authorization to operate it.