


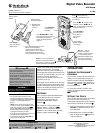

3
setting MIC sensitivity to Auto,wealso
recommend setting the MIC to
Hi (high)
for conference recording, while we
recommend a setting of
Lo (low) for
dictation recording.
7. Press
SET/DISP when the desired
microphone sensitivity flashes to
confirm it.
VOX appears and either On or
OFF flashes.
8. Repeatedly press
VOL+/VOL– to turn
VOX on or off.
9. Press
SET/DISP when the desired
setting flashes to confirm it.
BEEP
appears and either On or OFF flashes.
10. Repeatedly press
VOL+/VOL– to turn
the button confirmation tone on or off.
11. Press
SET/DISP to confirm the setting
and resume normal operation.
RECORDING
Voice Activated
To record, you can use either the internal
microphone or you can plug an external
microphone into the
MIC jack on the top of
the recorder.
For the best results, place the recorder 5 in.
to 3.3 ft (13 cm to 1 m) from the audio
source. To find the optimum distance
between the recording source and the
recorder, experiment with various
distances. Ô
If you enabled voice-activated recording,
VOX appears and recording begins whenever
the recorder detects sound.
REC and VOX
flash. Ô
Manual
1. Select a folder (See “Programming the
Recorder”) and press
REC/STOP to start
recording. The current date and time
appear briefly and are recorded as the
date and time stamp for the current
message.
REC flashes and the current message
number and elapsed recording time
appear.
2. Toviewtheavailablerecordingtimeleft
in the folder, hold down
SET/DISP.
REMAIN appears and the remaining
recording time appears. Release
SET/
DISP
to resume normal recording.
3. Press
REC/STOP again to stop manual
recording.
MARKING AN INDEX
DURING RECORDING
Indexes may be added to the recorded
messages so that you can search and listen
to specific sections of a message easily. Up
to a total of 99 indexes may be marked in
messages in the same folder.
To mark an index, press
MODE/INDEX when
a message is being recorded.
INDEX,the
index number and the total number of
indexes in the message appear briefly. (
01/
05 indicates index one of five, with 1 being
the current index number and 5 being the
total number of the indexes.) Ô
PLAYING BACK MESSAGES
When the recorder is in recorder mode:
1. Rotate
up or down to scroll
through the messages until the desired
number appears. Various information of
the message will be shown and
updated automatically.
2. Press
to start playback. g
flashes. The date and the time stamp
appear briefly.
3. Press
VOL+/VOL– to increase or
decrease playback volume. The
playback volume setting appears briefly.
4. To view a messages remaining
playback time, hold down
SET/DISP
during playback. REMAIN and the
remaining time appear. Release
SET/
DISP
to resume normal playback.
5. To pause playback, press
.Toresumepress
again.
6. The recorder automatically stops at the
end of each message. To stop playback
sooner, press
.
FAST-FORWARDING/
R
EWINDING
1. Repeatedly rotate up or
down until the desired message number
appears.
2. Press
to listen to the
message.
3. Rotate or hold down
up or
down to rewind or fast-forward.
4. When the recorder reaches the end of a
message while fast-forwarding, the
recorder stops.
When the recorder reaches the
beginning of a message while
rewinding, the recorder stops.
LOCATING AN INDEX
IN A
MESSAGE
1. Repeatedly rotate up or
down until the desired message number
appears.
2. Press
to listen to the
message.
Ô NOTE Ô
Voice Activated
• For low microphone sensitivity setting,
suggest recording distance of about 5 in.
(13 cm). For high microphone sensitivity
setting, suggest recording distance of about
3.3 feet (1 m). When in auto microphone
sensitivity setting, you can obtain the best
recording result within a larger distance
range (around 5 in.–3.3 ft. since the recorder
automatically adjusts the recording
sensitivity for different distances.
• If the recorder does not detect sound for
about 2 seconds during recording, the
recorder stops, and
REC and VOX stop
flashing.
• When you begin recording in the selected
folder, the recorder assigns a number to your
message and the number appears. Message
numbers are sequentially assigned from 01–
99.
• When the number of stored messages in a
folder reaches 99,
FULL appears when you
press REC/STOP. Continue recording in the
other folder. If the recording time in all
folders is used up, you cannot record until
you erase some messages. See “Erasing
Messages” on Page 4.
Marking an Index During Recording
• When there are already 99 indexes in the
current folder and MODE/INDEX is pressed
during recording,
FULL appears.
• When the recorder has reached full
recording capacity and REC is pressed,
FULL
appears. You may erase some of the
messages to free up recording capacity.
• When recording capacity is used up during
recording,
FULL appears and recording stop
automatically
Specifications
Recording Medium..................... Built-In Flash Memory
Recording Time ..................................51 minutes(SP),
68 minutes (EP), 90 minutes (LP)
Frequency Range ................. 350Hz–2500Hz@ –6 dB
Speaker ............................................... 23mm diameter
Maximum Power ............................................. 100mW
Earphone Jack ....................... 3.5mm diameter, 8 ohm
Microphone Jack ..
1
/8-inch (3.5mm) diameter, 2 Kohm
Power Requirement ................ AAA size 1.5V alkaline
battery × 2
Battery Life ........ about 40 hours continuous recording
5 hour continuous playback
Dimensions ............................ 1
11
/16 × 4
1
/8 ×
9
/16 inch
(44 × 105 × 15 mm)
Weight ........................... 1.5 oz (43g) without batteries
Accessories ......................................... Carrying pouch
Specifications are typical; individual units might vary.
Specifications are subject to change and improvement
without notice.