Paragon II QSG 3
QSG-P2-0J-v4.5-E y 255-30-6010-00
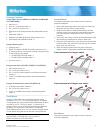
1. Secure the cable-support bar to the front end of the side
brackets, near the side brackets' “ears,” using two of the
included screws.
2. Slide the user station or KVM switch between the side
brackets, with its rear panel facing the cable-support bar,
until its front panel is flush with the back edges of the side
brackets.
3. Secure the user station or switch to the side brackets using
the remaining included screws (three on each side).
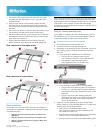
4. Mount the entire assembly in your rack and secure the side
brackets' ears to the rack's front rails with your own screws,
bolts, cage nuts, and so on.
5. When connecting cables to the rear panel of the user
station or switch, drape them over the cable-support bar.
Rear rackmount of a Paragon switch
Rear rackmount of a user station
QS Rule
Basic Installation
Ensure that you have turned OFF all servers and Paragon II
devices prior to installation. Installing a basic Paragon II system
involves these steps.
Step (A): Connect Stacking Units to a Main Unit
(Optional)
Step (B): Connect User Stations to the Main Unit
Step (C): Connect Servers to Paragon II Main and
Stacking Units
Note: Users and servers can be located up to 1000 feet (304 m)
apart. However, try to limit the cable length between the CIM
and Paragon II switch to less than 100 feet (30.5 m) for optimal
video quality, and if possible, limit the total cable length
between the user and target server to less than 500 feet (152 m)
for good video quality.
Step (A): Connect Stacking Units
If your Main Unit supports the use of Stacking Units, such as
P2-UMT832M, you can connect compatible Stacking Units to
expand the number of channel ports in the system.
To connect one or more Stacking Units
1. Connect the power cord to the Main Unit.
2. Connect the power cord to the Stacking Unit.
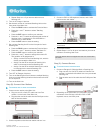
3. Depending on the Stacking Unit you purchased, use one or
two stacking cables to connect the Stacking Unit to the
Main Unit.
a. For connecting P2-UMT832S to P2-UMT832M:
Plug one end of a stacking cable into the
port—Expansion Port Out—on the Stacking Unit.
Plug the other end of the cable into the
port—Expansion Port—on the Main Unit.
b. For connecting P2-UMT1664S to P2-UMT1664M:
Plug one end of the stacking cable into "Expansion
Port Out A" on the Stacking Unit and the other end
of the cable into the lower "Expansion Port In" on the
Main Unit.
Plug one end of the other stacking cable into
"Expansion Port Out B" on the Stacking Unit and the
other end of the cable into the upper "Expansion
Port In" on the Main Unit.
4. (Optional) You can cascade up to three P2-UMT832S
Stacking Units for a P2-UMT832M Main Unit. To add more
Stacking Units, follow this procedure:
a. Plug one end of a stacking cable into the
port—Expansion Port In—on the last Stacking Unit
connected to the Main Unit.
b. Plug the other end of the cable into the port—Expansion
Port Out—on the newly added Stacking Unit.
c. Connect a power cord to the newly added Stacking Unit.