


5.2. Connecting the debugger
For this tutorial it is necessary for you to power the RSK from the supplied PSU. The E10A module will be powered via the USB cable.
Please be aware that if you have too many devices connected to your USB port it may be shut down by Windows. If this happens remove
some devices and try again. Alternatively you can provide an external power source, taking care to ensure the correct polarity and voltage.
The Quick Start Guide provided with the RSK board gives detailed instructions on how to connect the E10A to the host computer. The
following assumes that the steps in the Quick Start Guide have been followed and the E10A drivers have been installed.
• Fit the LCD module to LCD on the RSK, so it lies above JA1. Ensure all the pins of the connector are correctly inserted in
the socket.
• Connect the E10A debugger to the USB port on your computer.
• Connect the E10A debugger to the target hardware ensuring that it is plugged into the connector marked E10A.
• An external power to the board can be turned on now.
5.3. Connecting to the target with the E10A
This section will take you through the process of connecting to the device, programming the Flash and executing the code.
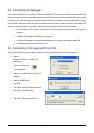
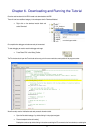
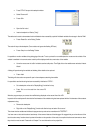
• Select the
‘SessionSH7137Series_E10A_USB_SYST’
debug session.
• Click the <Connect> button
on the debug toolbar
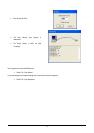
• Select the correct Microcontroller type (SH7137
illustrated)
• Select ‘E10A-USB Emulator’
• Press <OK>
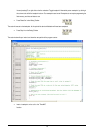
• Press ‘Reset’ button on the RSK board and then
press <OK> in ‘heush7080’ dialog.
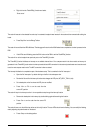
• Type ’10.00’ in MHz field and press <OK>
7