


x
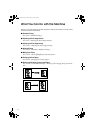
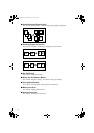
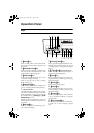
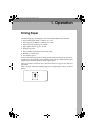
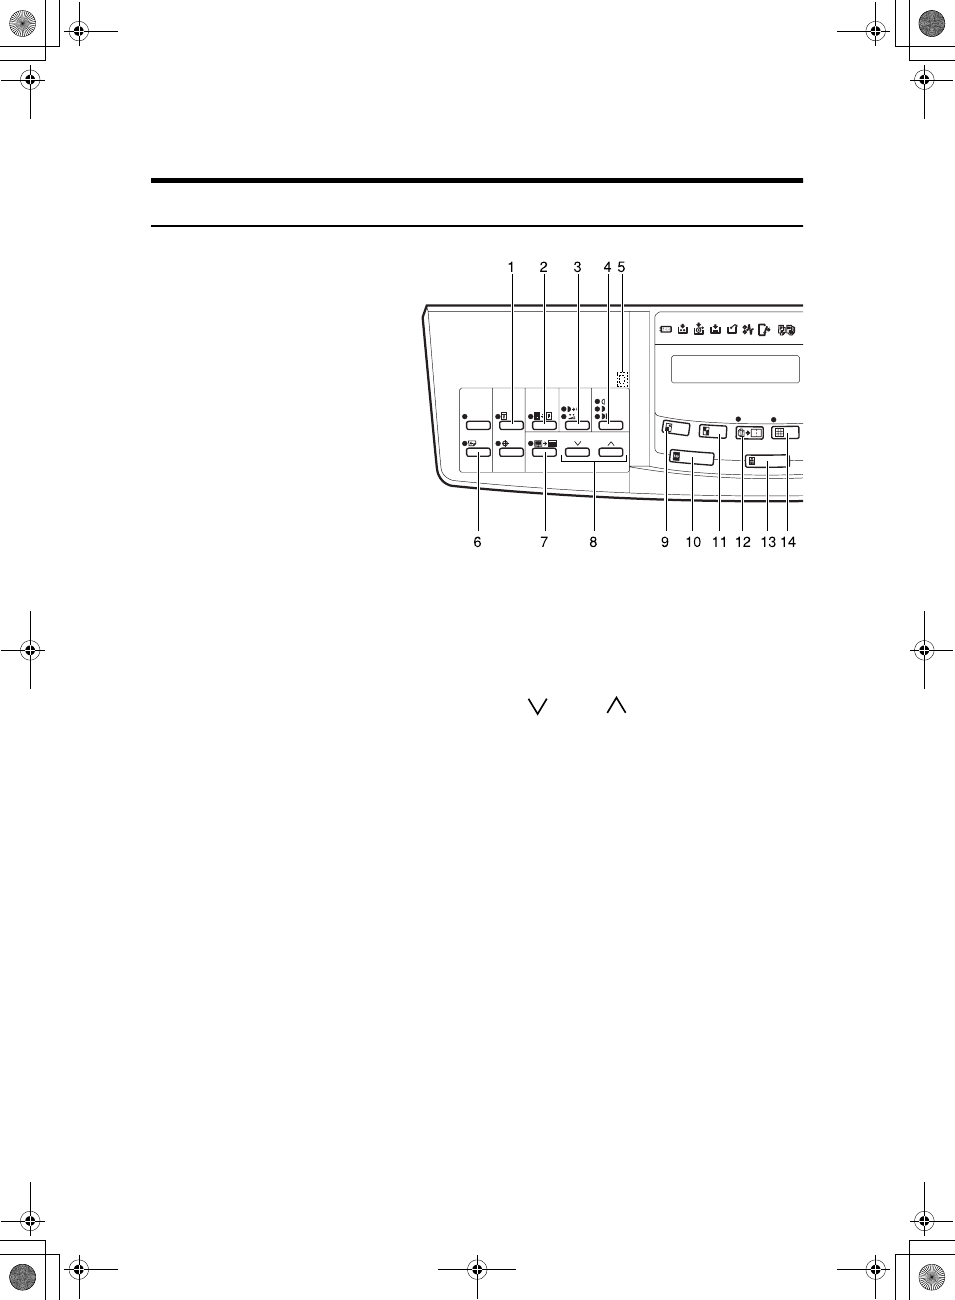
Operation Panel
Keys
1. {
{{
{
Security
}
}}
} key
Press to make prints of secret documents.
See ⇒ P.42 “Security Mode—Printing Secret
Documents”.
2. {
{{
{
Paste Shadow Erase
}
}}
} key
Press to erase the shadow of pasted origi-
nals. See ⇒ P.22 “Paste Shadow Erase—Eras-
ing the Shadow of Pasted Originals”.
3. {
{{
{
Tint/Economy
}
}}
} key
Press to make halftone prints. See ⇒ P.12
“Tint Mode—Halftone Printing”.
Press to save ink. See
⇒ P.25 “Economy
Mode—Saving Ink”.
4. {
{{
{
Image Density
}
}}
} key
Press to make prints darker or lighter. See
⇒ P.11 “Adjusting the Print Image Density”.
5. Check Indicator
This indicator lights when you have select-
ed one or more of the functions accessed by
lifting the behind cover and pressing the
keys underneath (e. g.
{
Security
}
key,
{
Paste
Shadow Erase
}
key etc.).
This lets you know whether one or more of
these functions is selected, even if the cover
is lowered.
6. {
{{
{
Skip Feed
}
}}
} key
Press to select skip feed printing. See ⇒
P.37 “Skip Feed Printing”.
7. {
{{
{
Center/Edge Erase
}
}}
} key
Press to print book originals that have a sol-
id image on the centre or edges. See ⇒ P.18
“Centre/Edge Erase—Erasing centre and Edge
Margins”.
8. {
{{
{}
}}
} and {
{{
{}
}}
} keys (Scroll keys)
Press to select size and direction of paper or
original in Centre/Edge Erase.
9. {
{{
{
Reduce
}
}}
} key
Press to reduce the image. See ⇒ P.16 “Pre-
set Reduce/Enlarge—Reducing and Enlarging
Using Preset Ratios”.
10. {
{{
{
Full Size
}
}}
} key
Press to make full size prints.
11. {
{{
{
Enlarge
}
}}
} key
Press to enlarge the image. See ⇒ P.16 “Pre-
set Reduce/Enlarge—Reducing and Enlarging
Using Preset Ratios”.
12. {
{{
{
Combine
}
}}
} key
Press to combine originals onto 1 print. See
⇒ P.33 “Combine—Combining 2 Originals
onto One Print”.
13. {
{{
{
Type of Original
}
}}
} key
Press to select Letter, Photo, or Letter/Pho-
to mode. See ⇒ P.24 “Selecting Original
Type”.
SilverV-gb.book Page x Monday, May 15, 2000 3:32 PM