4
CONNECTION
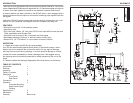
Shown here is an example of possible input connections to the GCi404.
• If the microphone connected to the
Mic Input is a condenser micro-
phone, move the Phantom Power
jumper to the ON position.
• The guitar signal may also be
connected to a guitar preamp or
processor before being connected
to the GCi404.
• Turntables must use all three con-
nections; the Right, Left, AND the
Ground terminals are required for
proper operation.
• Standard CD players may be con-
nected to the RCA LINE INPUT in
the same manner as the Portable
CD Player.
3
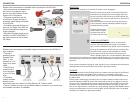
Shown here is an example of possible output connections from the GCi404 to
your computer.
• The unit is
powered via the
included Rolls
PS27, or con-
nected to a 3-1/2”
floppy drive power
cable.
• The CD Input
connects via a
4-pin connector
to your CD Rom
drive.
• The Stereo
Output connects
directly to your
sound-card Input via a stereo Tip-Ring-Sleeve 1/8” (3.5mm) cable.
• The Line Output port uses a 4-pin header cable to connect to your sound-card
Input header connector (if available).
OPERATION
MOUNTING
Make sure the computer is off, and the AC power cord is unplugged.
Select the drive bay you wish to mount the GCi404 into.
Remember that you will have cords hanging down from
the unit, so below a CD Rom drive is recommended. Re-
move the drive bay cover and gain access to the inside of
your computer.
Place the GCi404 into the open drive bay and secure it
to the computer’s internal mounting brackets using the
enclosed mounting screws.
Connect all Power and
Output cables. Plug the
computer back into an
AC outlet, and start it up.
LEVEL ADJUSTEMENT
Connect the microphone, instrument, and line/phono
sources. If the microphone being used is a condenser
type, move the Phantom Power jumper to the ON position.
Bring up the software you will be using for recording. Set
the LINE LEVEL control to approximately 12 O’Clock.
Send a signal from the line sources (CD players, turn-
tables, cassette players etc.) first and adjust the Recording
Control levels for a maximum input signal without clipping. You may need to refer to your
operating system Help menues or owners manual for assistance in adjusting input record-
ing levels.
Once you have a desired signal level, send signals from your instrument and microphone
and adjust the Levels on the GCi404 front panel for appropriate levels.
DUCKING
NOTE: Adjustements for the Ducking function are made on the rear panel of the GCi404.
You will need access to the inside of the computer if it is mounted in a drive bay.
To automatically mute all signals under your microphone, move the DUCKING jumper to
the ON position.
Send program material such as music to the Line Inputs. Speak normally into the micro-
phone and adjust the DEPTH control until the desired amount of Line signal is heard un-
der your voice. If you want the Line signal muted completely, set the DEPTH control fully
clockwise. Set the RELEASE control for the desired amount of time taken to return the
level of Line signal back to normal after you stop speaking. When the RELEASE control is
set fully counterclockwise, the time is at its longest. As the RELEASE control is adjusted
clockwise, the release time gets shorter (faster).


