


14 Runco CP-42HD/CP-52HD Owner’s Operating Manual
Installation
Proper installation of your Climate Series LCD will ensure the highest possible
picture quality. Whether you are installing the Climate Series LCD temporarily or
permanently, you should take the following into account to ensure that it performs
optimally.
You can either place the Climate Series LCD on a table or in an entertainment
center, or mount it on a wall.
If you do decide to wall-mount the Climate Series LCD, ensure that the wall-
mount bracket is installed according to the instructions included with it. The wall
must be capable of supporting a redundant weight factor three (3) times the
weight of the display, or be reinforced.
Runco recommends that this be done by a customer installation specialist.
Use only the Runco-approved wall-mount kit designed for your
display.
Other considerations and tips that can help improve your installation:
Keep the Climate Series LCD away from devices that radiate
electromagnetic energy such as motors and transformers. Common sources
of these include slide projectors, speakers, power amplifiers and elevators.
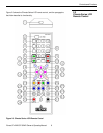
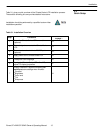
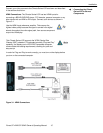
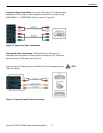
Proceed as follows to connect the Climate Series LCD to your video sources,
external controller(s) – if present – and AC power.
When connecting your equipment:
Turn off all equipment before making any connections.
Use the correct signal cables for each source.
Ensure that the cables are securely connected. Tighten the thumbscrews on
connectors that have them.
Use the left audio input when connecting mono audio sources.
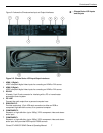
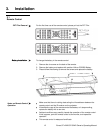
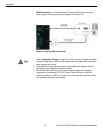
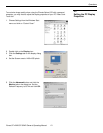
To access the rear input/output connectors, loosen the two captive screws on the
input/output cover and remove the input/output connector cover.
3.3
Installation
Considerations
Wall-Mounting the Climate
Series LCD
3.4
Connections to the
Climate Series LCD
Input/Output Connection
Panel Access