


Setting up & Operating the RESOLV 65
8
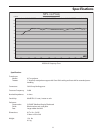
Note: Just about all un-shielded speaker wire will have a marking indicating the negative side. To avoid phase
cancelation problems, be sure to maintain the correct connection for the positive and negative sides throughout
your system.
Connecting the Resolv 65
Note: Before plugging in and turning on, remember the “last on first off” rule of power amplifiers. When powering
up your system, be sure to that all the wires are connected, turn your mixer and any other outboard gear on, and
then last turn your power amplifier on. When powering down, turn your power amp off first and then your mixer
and outboard gear.
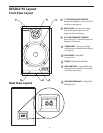
The Resolv 65 connections are made via the rear panel 5-way binding posts. You can use banana plugs, spade
lugs or tinned and stripped wire. Standard strained speaker wire of 12-14 gauge is recommended and you
should use the shortest possible wire length (equal on both sides) on both the left and right monitor.
Speaker Cable (Un-Shielded)
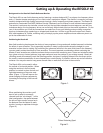
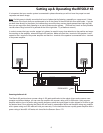
Positioning the Resolv 65 - continued
When choosing the height of your monitor
system, be careful to avoid reflections off
the surface of the mixing console. (Figure
3.) These reflections arrive at the listening
position slightly delayed from the original
sound resulting in strange cancellations and
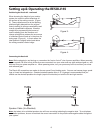
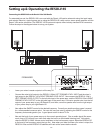
overall unpredictable response. Visualize
straight lines representing the beams of
sound radiating from the monitors and
choose a height that reduces the occurrence
of reflections that will end up in the prime lis-
tening spot. (Figure 4.) In most cases, the
ideal position is slightly behind and above
the mixing console’s meter bridge.
Prime Listening Spot
Figure 3.
Figure 4.