


5
2. Press
PLAY
.
ED
EDED
ED
or
E<<ý
E<<ýE<<ý
E<<ý
flashes.
3. Press –/
)
or
+
/
-
so
E<<
E<<E<<
E<<
flashes to turn
off the key tone or
ED
EDED
ED
flashes to turn on
the key tone.
4. Press
STOP
to finish the setting and exit
the options mode.
5'66+0)"6*'"6+/'
1. Hold down
MENU/FOLDER
for more than
one second while the recorder is
stopped, then repeatedly press or hold
down –/
)
or
+
/
-
until
J?C;ý
J?C;ýJ?C;ý
J?C;ý
flashes.
2. Press
PLAY
.
3. See “Setting the Clock” on Page 2 for
instructions on setting the time.
75+0)"6*'"4'%14&'4"
9+6*"#"2%"
You can use the supplied RadioShack Digital
Wave Player software to:
• download the files in your recorder to
your computer
• store and manage voice recordings
made with the recorder
• play back files
• record voice files directly on a PC using
the recorder with a USB terminal
connector
Before transferring recorded files or recording
directly to the PC, be sure:
• the recorder is connected to the PC
properly
• 25 MB or more of the hard-disk space
are available (to assure stable
performance of the PC)
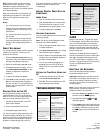
• the PC’s free memory is sufficient for
recording a .wav file. This table shows
the file size and transfer time of a 5-
minute .wav file:
Notes:
• The RadioShack Digital Wave Player
software is for use exclusively with the
DR-86. It is not to be used with other
recorders.
• You cannot send files from the PC to the
recorder or overwrite files in the recorder
with RadioShack Digital Wave Player.
• RadioShack Digital Wave Player does
not support speech-recognition software.
• RadioShack Digital Wave Player does
not support Apple Macintosh computers.
• These instructions assume users are
familiar with Microsoft Windows
software. For details on PC operation or
your operating system, refer to the
operating instructions for your PC.
• If you are installing the software on
Windows 2000 or Windows XP
Professional, you must log in as the
administrator.
12'4#6+0)"'08+410/'06
Operating system: Microsoft Windows 98/Me/
2000 Professional/XP.
Note:
USB support is not available if
Windows 98/Me/2000/XP is upgraded from
Windows 95, even if the PC is equipped with
a USB port.
+056#..+0)"&+)+6#."9#8'"
2.#;'4
Notes:
•Do
not
connect the recorder and the PC
before installing RadioShack Digital
Wave Player.
• Close any open applications before you
start installation of RadioShack Digital
Wave Player.
1. Place the RadioShack Digital Wave
Player CD-ROM in the CD-ROM
drive.
The installation program automatically
starts. If it does not, double-click the
CD-
ROM
icon in the Explorer window, then
double-click the
Setup.exe
icon.
2. Install RadioShack Digital Wave Player
by following the instructions that appear
on the screen.
3. After completion of setup, remove the
CD-ROM from the CD-ROM drive.
70+056#..+0)"&+)+6#."9#8'"
2
.#;'4
1. Click
Start/Programs/RadioShack Digital
Wave Player/Uninstall Digital Wave Player
.
2. Follow the on-screen instructions to
uninstall the RadioShack Digital Wave
Player.
4700+0)"&+)+6#."9#8'"2.#;'4
Note:
Before making any connections, make
sure that the recorder is stopped.
Connect the recorder to your PC by plugging
one end of the supplied USB cable into the
PC I/F
port on your recorder and the other end
of the cable to the back of your PC (refer to
your PC’s owner’s manual for the location).
The RadioShack Digital Wave Player starts,
and the main window automatically appears.
To use RadioShack Digital Wave Player
without connecting the recorder to the PC, or
if RadioShack Digital Wave Player does not
start automatically when you connect the
recorder to the PC, click
Start/Programs/
RadioShack Digital Wave Player/Digital Wave
Player
.
To exit RadioShack Digital Wave Player, click
on the
Exit
button in the upper right corner of
the window, or click
File/Exit Digital Wave
Player
.
Notes:
• It may take a few minutes to start the
RadioShack Digital Wave Player for the
first time.
• You cannot operate the buttons and
controls on the recorder, except for
microphone-sensitivity switch, while the
recorder is connected to the PC.
• Do not use any USB cable other than the
one supplied.
• Disconnect the USB cable after file
transfer or recording is completed.
64#05('44+0)"4'%14&'&"(+.'5"
61"6*'"2%
64#05('44+0)"#.."(1.&'45
Click the
Transfer All Folders
icon (the first
icon from the left on the tool bar). All files in
the recorder are transferred to the
corresponding PC’s folders. For example, all
files in Folder [A] on your recorder are
transferred to Folder A on your PC.
64#05('44+0)"#"5'.'%6'&"(1.&'4
Click the
Transfer Folder A
icon,
Transfer
Folder B
icon, or
Transfer Schedule Folder
icon
on the tool bar. All files in the selected folder
in the recorder are transferred to the
corresponding PC’s folder.
/QFG 5K\G"QH"HKNG 6TCPUHGT"6KOG
HQ About 3.2 MB About 1 minute
SP About 1.6 MB About 30 seconds
LP About 1.2 MB About 15 seconds
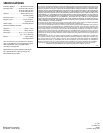
PC
IBM PC/AT-compatible
machine
CPU
Intel Pentium 166 MHz or
more
RAM 32 MB or more
Hard-Disk Space
25 MB (additional space
required to store voice
files)
Sound Card
Creative Labs Sound
Blaster 16 or any 100%
compatible sound card
Display
800
×
600 pixels min.,
256 colors min.
CD-ROM Drive
2X or faster
USB port
At least one free port
Audio Output
Jacks
Earphone (or speaker)
outputs