S
ETUP
G
UIDE
23
English
Step 7. Printing a Demo Page
Print a demo page to make sure that the printer is operating
correctly.
1
In ready mode, press and hold the Upper Level button
( ) on the control panel for 2 seconds to print a demo
page.
A demo page showing the printer’s features and capabilities
prints out.
Step 8. Changing the Display Language
To change the language that is displayed on the control panel,
take the following steps:
1
In ready mode press the Menu button ( ) on the control
panel until you see ‘Setup’ on the bottom line of the display.
2
Press the Enter button ( ) to access the menu.
3
Press the scroll button ( or ) until you see ‘LCD
Language’ on the bottom line.
4
Press the Enter button ( ) to confirm the menu item.
5
Press the scroll button ( or ) to display the language
you want to use.
6
Press the Enter button ( ) to save the selection.
7
Press the On Line/Continue button ( ) to return to
ready mode.
S
ETUP
G
UIDE
22
Using a network antenna
1
If you install the wired/wireless network card, you can use
your printer in wireless environment.
For details about installing the wired/wireless network card,
see the User’s Guide of your printer in the CD-ROM.
N
OTE
: After connecting the printer you need to configure the
network parameters on the control panel. See the User’s Guide of
your printer. You can use the software supplied with the card.
Refer to the software User’s Guide.
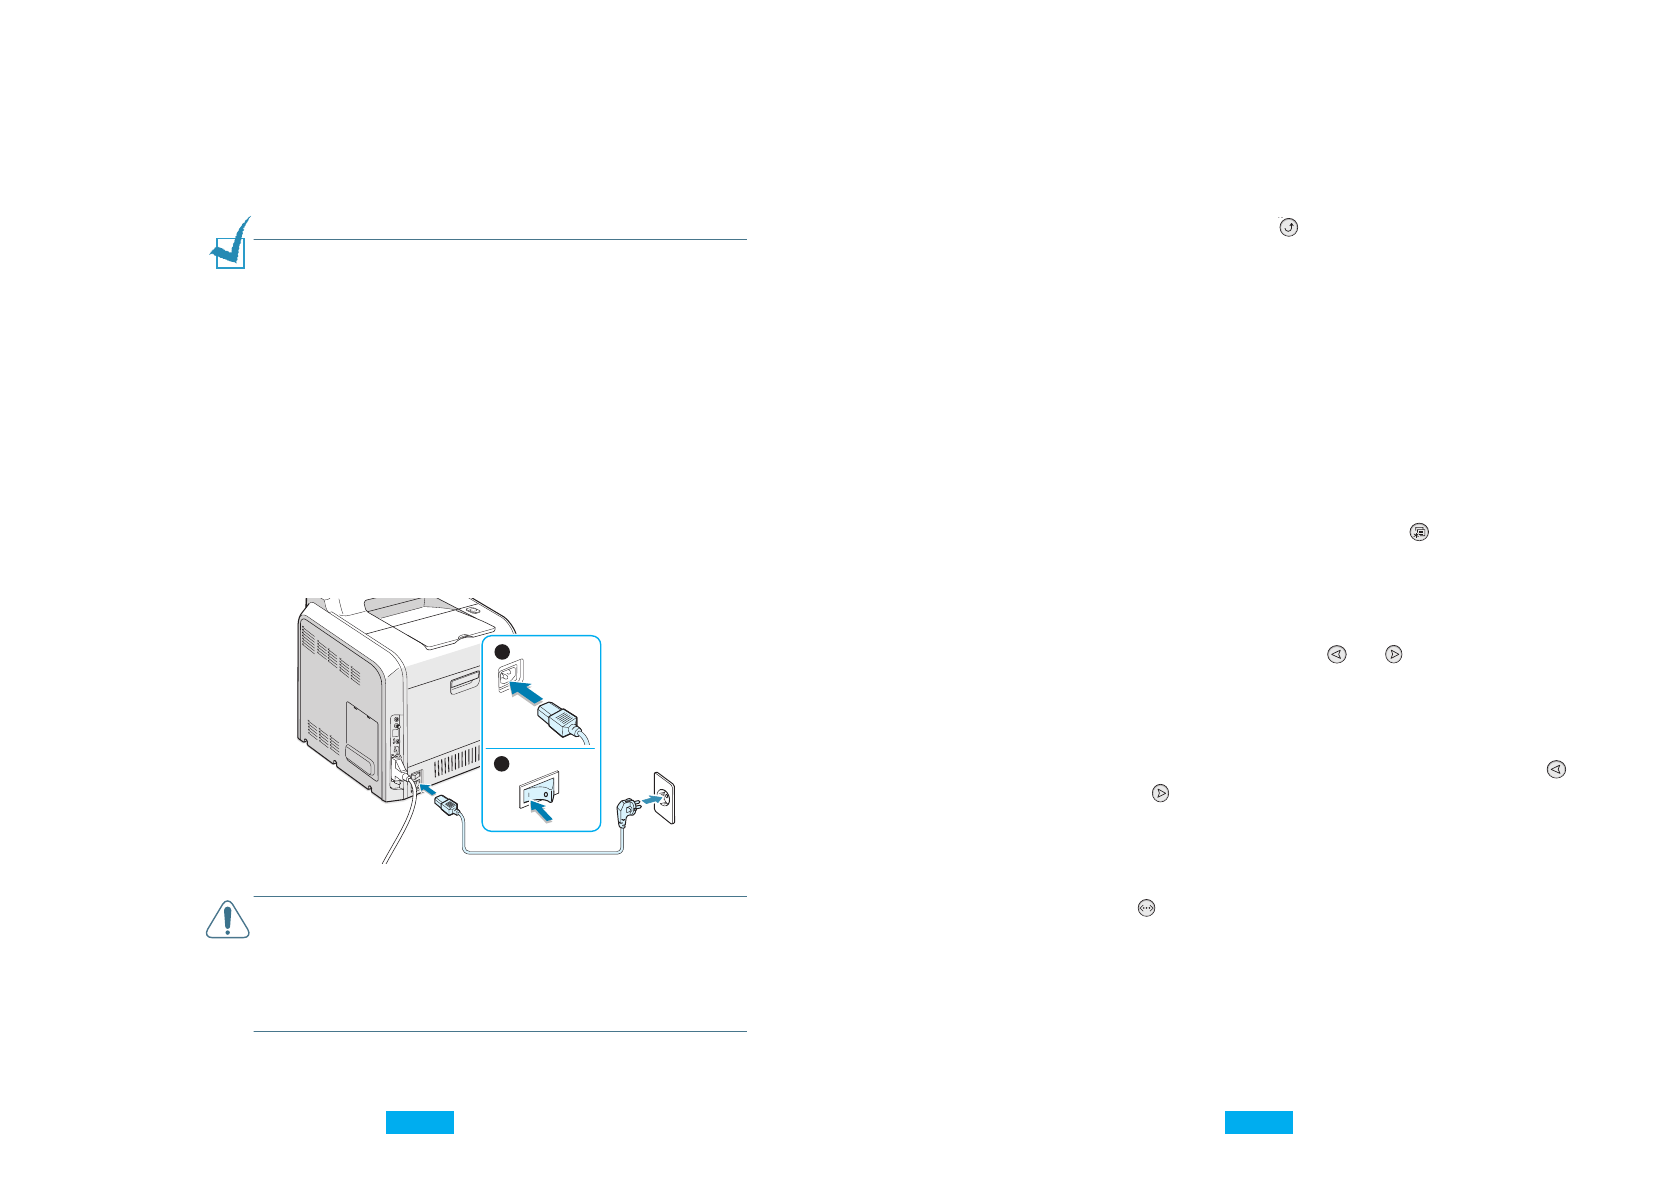
Step 6. Turning the Printer On
1
Plug the power cord into the power receptacle on the back
of the printer.
2
Plug the other end into a properly grounded AC outlet and
turn on the power.
C
AUTIONS
:
• Some parts inside of the printer may be hot when power is on or
after printing. Be careful not to burn yourself when working
inside the printer.
• Do not disassemble the printer when it is powered on. Doing so
may give you an electric shock.
2
1
22 23
Võrguantenni kasutamine
Vastava võrgukaardi installimisel te saate kasutada printeri
juhtmeteta keskkonnas.
Võrgukaardi installimise üksikasju vaadake kasutusjuhendist teie
printeri CD-ROM-il.
MÄRKUS: Pärast printeri ühendamist peate juhtimispaneeli abil
võrguparameetreid seadma. Vaadake oma printeri kasutusjuhendit.
Te võite kasutada ka kaardiga kaasas olevat tarkvara. Vaadake
tarkvara kasutusjuhendit.
Printeri sisselülitamine
Asetage toitejuhe printeri taga olevasse pesasse.
Asetage juhtme teine ots maandatud vahelduvvoolu pesasse ja
lülitage vool sisse.
HOIATUSED:
• Mõned printeri sisemised osad võivad printeri töötamise ajal või
peale seda kuumaks minna. Olge selle sees töötades ettevaatlik.
• Ärge võtke printerit lahti, kui see on voolu all. Tagajärjeks võib olla
elektrilöök.
Demolehe printimine
Printige välja demoleht veendumaks, kas printer töötab korrektselt.
Demolehe printimiseks vajutage 2 sekundiks juhtimispaneelil
nuppu Upper Level .
Trükitakse välja demoleht, mis näitab printeri seadeid ja võimeid.
()
Kuvari keele vahetamine
Juhtimispaneelil kuvatava keele vahetamiseks toimige järgnevalt:
Vajutage juhtimispaneelil nuppu Menu , kuni kuvari
alumisel real kuvatakse ‘Setup’.
()
Valikusse sisenemiseks vajutage nuppu Enter.
Vajutage lehitsemisnuppu või , kuni alumisele reale
ilmub ‘LCD Language’.
(
l
)
Menüüvaliku kinnitamiseks vajutage nuppu Enter.
Kasutatava keele kuvamiseks vajutage lehitsemisnuppu
või .
(
l
)
Valiku säilitamiseks vajutage Enter nuppu.
Algusse naasmiseks vajutage nuppu On Line/Continue
.
()
Samm 6.
Samm 7.
Samm 8.


