


only facilities authorized to repair Seagate drives. Seagate does
not sanction any third-party repair facilities.
Warranty. See your authorized Seagate distributor or dealer.
Configuring the drive
1. Put on a grounded wrist strap. Wear the grounded wrist
strap throughout the installation procedure.
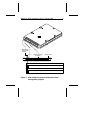
2. Install master/slave jumpers. In a two-drive system, you need
to designate one drive as the master, or drive 0, and the other
drive as the slave, or drive 1. To do this, install the master/slave
jumpers as shown in Figure 1. In a one-drive system, configure
the drive as a master (no jumpers installed).
Alternatively, you can configure the drive as a master or
slave using the cable select option. Cable selection re-
quires a special daisy-chain cable that grounds pin 28
(CSEL) on one of its two drive connectors. If you attach the
drive to the grounded CSEL connector, it becomes a mas-
ter. If you attach the drive to the ungrounded CSEL con-
nector, it becomes a slave. To use this option, the host
system and both drives must support cable select, and both
drives must be configured for cable select. To configure a
Marathon 420sl for cable select, install both master/slave
jumpers, as shown in Figure 1.
Attaching cables
This drive is designed for a host computer that supplies interface
signals and +5V power through a single 44-pin connector and
cable. If your computer has a fixed connector that attaches
directly to the drive, skip ahead to the following section, “Mount-
ing the drive.” Otherwise, attach the interface/power cable
as described on page 4.
2 Marathon 420sl Installation Guide, August 1995