


ENGLISH
7
E
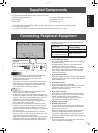
Supplied Components
If any component should be missing, please contact your dealer.
111098 1 2 3 4 5 712
6
15
14
13 1716
Expansion Board
When the PN-ZB02 (optional)
is attached
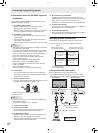
Caution
• Besuretoturnoffthemainpowerswitchanddisconnect
the plug from the power outlet before connecting/
disconnecting cables. Also, read the manual of the
equipment to be connected.
• Becarefulnottoconfusetheinputterminalwiththeoutput
terminal when connecting cables. Accidentally reversing
cables connected to the input and output terminals may
cause malfunctions and the other problems.
TIPS
• Imagesmaynotbedisplayedproperlydependingonthe
computer (video card) to be connected.
•
A screen with 1920 x 1080 resolution may not be displayed
correctlyonPCRGB.Inthiscase,checkthesettingsofyour
computer (video card) to verify that input signals conform to
specicationsofthismonitor.(SeeOperationGuide.)
• IfthereisacheckboxtodisableEDIDindisplaycontrol
panel,checkitwhenusingPCRGB.
• UsetheautomaticscreenadjustmentwhenaPCscreen
isdisplayedforthersttimeusingPCD-SUBorPCRGB,
orwhenthesettingofthePCischanged.Thescreenis
adjustedautomaticallywhenSELFADJUSTintheOPTION
menu is set to ON.
•
If the audio output from the playback device is connected
directly to speakers or other devices, the video on the monitor
may appear delayed from the audio portion.
Audio should be played through this monitor by connecting the
playback device to the monitor’s audio input, and connecting
the monitor’s audio output to the speakers or other devices.
• Theaudioinputterminalsusedineachinputmodeare
factory-setasfollows.
Input mode
Audio input terminal
(Factory setting)
PCD-SUB,PCDVI-D,PCRGB
Audio input terminal
AVDVI-D Audio1 input terminal
AVCOMPONENT,
AVS-VIDEO,AVVIDEO
Audio2 input terminal
PCHDMI,AVHDMI PC/AVHDMIinputterminal
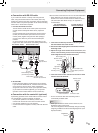
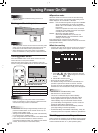
1. PC/AV HDMI input terminal
• UseacommerciallyavailableHDMIcable(conformingto
theHDMIstandard).
• SetHDMIofINPUTSELECTontheOPTIONmenu
according to the device to be connected.
• SelecttheaudioinputterminaltobeusedinPCHDMI
orAVHDMIofAUDIOSELECTontheOPTIONmenu.
WhenHDMIisselected,connectiontotheaudioinput
terminal is unnecessary.
2. PC D-sub input terminal
• WhenthePN-ZB02(optional)isattached,selecttheaudio
inputterminaltobeusedinPCD-SUBofAUDIOSELECT
on the OPTION menu.
3. Audio input terminal
• Useanaudiocablewithoutresistance.
• WhenthePN-ZB02(optional)isattached,settheaudio
inputterminalusedforeachinputmodeinAUDIO
SELECTontheOPTIONmenu.
4. Audio output terminals
• Theoutputsoundvariesdependingontheinputmode.
• Thevolumeoftheoutputsoundcanbexedbysetting
AUDIOOUTPUT(RCA)ontheOPTIONmenu.
• Itisnotpossibletocontrolthesoundoutputfromthe
audiooutputterminalswiththeAUDIOmenu.
5. RS-232C output terminal
6. RS-232C input terminal
• YoucancontrolthemonitorfromaPCbyconnectinga
commerciallyavailableRS-232straightcablebetween
theseterminalsandthePC.
•
WhenusingthePN-ZR01controlkit(optional)toperform
operation of multiple monitors with the remote control
unit, connect multiple monitors in a daisy chain using the
commerciallyavailableRS-232straightcable.(Seepage@.)
7. Control kit terminal
• ConnectstheremotecontrolsensorboxofthePN-ZR01
controlkit(optional).(Seepage@.)
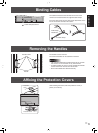
Connecting Peripheral Equipment
LiquidCrystalDisplayMonitor:1
Cableclamp:2
Power cord
CD-ROM(UtilityDiskforWindows):1
Operation manual: 1
Protection cover: 4
* SharpCorporationholdsauthorshiprightstotheUtilityDiskprogram.Donotreproduceitwithoutpermission.
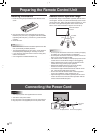
* For environmental protection!
Donotdisposeofbatteriesinhouseholdwaste.Followthedisposalinstructionsforyourarea.