


4
E
MOUNTING PRECAUTIONS
• Thisproductisforuseindoors.
• Sincethemonitorisheavy,consultyourdealerbeforeinstalling,
removingormovingthemonitor.
• Wheninstalling,removingormovingthemonitor,ensurethatthis
iscarriedoutbyatleast2people.
• AmountingbracketcompliantwithVESAspecicationsisrequired.
DonotuseanyscrewholesotherthanVESAholesforinstallation.
•
ToattachaVESA-compliantmountingbracket,useM6screwsthat
are5/16inch(8mm)to3/8inch(10mm)longerthanthethickness
ofthemountingbracket.
•
Whenmovingthemonitor,besuretoholditwitheitherbothhandles
orthe4cornersonthebottomoftheunit.Donotplaceyourhand
onthescreen.Thismaycauseproductdamage,failure,orinjury.
• Installthemonitorwiththesurfaceperpendiculartoalevelsurface.
• Mountingthemonitoronthewallrequiresspecialexpertiseand
theworkmustbeperformedbyanauthorizedSHARPdealer.You
shouldneverattempttoperformanyofthisworkyourself.Our
companywillbearnoresponsibilityforaccidentsorinjuriescaused
byimpropermountingormishandling.
• Thismonitorshouldbeusedatanambienttemperaturebetween
41°F(5°C)and95°F(35°C).Provideenoughspacearoundthe
monitortopreventheatfromaccumulatinginside.
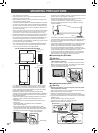
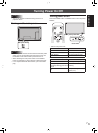
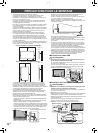
For the monitor in horizontal orientation
7-7/8 [20]
Unit: inch [cm]
2 [5]
2
[5]
2
[5]
For the monitor in vertical orientation
Unit: inch [cm]
2 [5]
2
[5]
2
[5]
7-7/8 [20]
1-7/16 [3.5]
1-13/16 [4.5]
• Ifitisdifficulttoprovidesufficientspaceforanyreasonsuchas
theinstallationofthemonitorinsideahousing,oriftheambient
temperaturemaybeoutsideoftherangeof41°F(5°C)to95°F
(35°C),installafanortakeothermeasurestokeeptheambient
temperaturewithintherequiredrange.
• Temperatureconditionmaychangewhenusingthedisplay
togetherwiththeoptionalequipmentsrecommendedbySHARP.In
suchcases,pleasecheckthetemperatureconditionspecifiedby
theoptionalequipments.
• Adheretothefollowingwheninstallingthemonitorinitsvertical
orientation.Failingtoadheretothefollowingmaycause
malfunctions.
-InstallthemonitorsuchthatthepowerLEDislocatedonthe
bottomside.
-SettheMONITORontheSETUPmenutoPORTRAIT.
(SeeOperationmanual.)
-Besuretoclampthepowercord(supplied)ontothecable
clampattachmentbelowusingthesuppliedcableclamp.When
clampingthepowercord,takecarenottostresstheterminalof
thepowercord.Donotbendthepowercordexcessively.
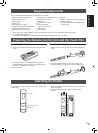
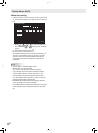
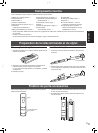
Power cord (Supplied)
Cable clamp
Cable clamp attachment
• Donotblockanyventilationopenings.Ifthetemperatureinsidethe
monitorrises,thiscouldleadtoamalfunction.
• Aftermounting,pleasecarefullyensurethemonitorissecure,and
notabletocomeloosefromthewallormount.
• Donotplacethemonitoronadevicewhichgeneratesheat.
• Usethesuppliedverticalstickerwhenyouinstallthemonitorin
verticalorientation.
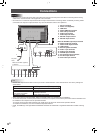
Operation panel
Logo
Donotremovethefactory-afxedstickerbutafxthelogosticker
overit.Becarefulnottocovertheremotecontrolsensororbuttons.
• Besuretouseawall-mountbracketdesignedordesignatedfor
mountingthemonitor.
• Thismonitorisdesignedtobeinstalledonaconcretewallorpillar.
Reinforcedworkmightbenecessaryforsomematerialssuchas
plaster/thinplasticboard/woodbeforestartinginstallation.
Thismonitorandbracketmustbeinstalledonawallwhichcan
endureatleast4timesormoretheweightofthemonitor.Installby
themostsuitablemethodforthematerialandthestructure.
• Donotusetheproductinlocationswheretheunitisexposedto
directsunlightorotherstronglight.Sincethisproductoperates
withinfraredrays,suchlightmaycauseamalfunction.
■
Connecting the USB cable
Warning:
Contact your dealer or a service engineer to have the USB •
cable installed or removed.
Riskofelectricalshockorinjuryifyouattempttheworkyourself.
• BeforeconnectingtheUSBcable,turnoffthemainpowerswitch
anddisconnectthepowercablefromtheoutlet.
• UseonlythesuppliedUSBcable.
■
Installing the power switch
Warning:
Contact your dealer or a service engineer to have the power •
switch installed or removed.
Riskofelectricalshockorinjuryifyouattempttheworkyourself.
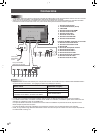
1.Removethescrew(x1)fromthemonitor.
2.Removetheprotectivesealandconnectthepowerswitch
connector,makingsuretheconnectorisinthecorrectorientation.
3.Aligntheclampswiththeslotinthebottomoftheunitandtighten
thescrews(x2).
Makesurethattheclampsarermlysecured.
Takecarethatthecableisnotcaughtorpinched.
4.Replacethescrewthatwasremovedin1.
Bottom
Power switch
Mounting
bracket
Protective seal
Connector
Mounting
bracket