


ENGLISH
5
E
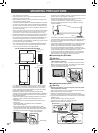
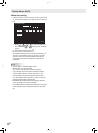
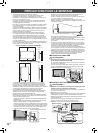
Attaching the Holder
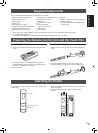
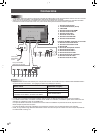
Supplied Components
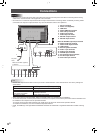
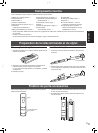
Preparing the Remote Control Unit and the Touch Pen
Installing the batteries
1. Press the cover gently and slide it in the direction of the
arrow.
2. See the instructions in the compartment and put in the
suppliedbatteries(R-6(“AA”size)x2)withtheirplus(+)
andminus(-)sidesorientedcorrectly.
3.Closethecover.
Inserting the battery
1. Rotate the battery cap and remove it, and then pull out the
cover.
Battery cap
2.Insertthesuppliedbattery(LR-03(“AAA”size))inthe
orientation shown, and attach the cover and battery cap.
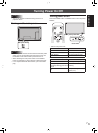
If any component should be missing, please contact your dealer.
LiquidCrystalDisplayMonitor:1
Remote control unit: 1
Cableclamp:2
Power cord
R-6battery(“AA”size):2
CD-ROM(UtilityDiskforWindows):1
Setup Manual (this manual): 1
Stand hole protection cover: 2
* SharpCorporationholdsauthorshiprightstotheUtilityDiskprogram.Donotreproduceitwithoutpermission.
* For environmental protection!
Donotdisposeofbatteriesinhouseholdwaste.Followthedisposalinstructionsforyourarea.
Verticalsticker(Operationpanel):1
Verticalsticker(Logo):1
Touch pen: 1
Pen tip (for touch pen): 2
Touch pen battery
(LR-03(“AAA”size)):1
USBcable:1
Power switch: 1
Eraser: 1
Holder:1(With2hookandloopfasteners)
CoverSharplogo:1
Place this sticker onto the SHARP logo to
cover the logo.
The touch pen, remote control unit, and eraser can be stored
in the holder.
Touch pen
Remote control unit
and Eraser
1.Removethepeel-offsheetsfromthefastenersontheback
side of the holder.
2.Withtheholderspreadtaut,afxittothesideofthe
monitor.
Back side