


SVP 450 PLUS - SVD 500 PLUS
21
ENGLISHENGLISH
ENGLISHENGLISH
ENGLISH
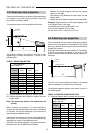
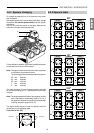
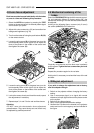
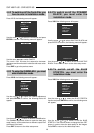
4.6 Projector centering
The first step towards a good installation is centering the
projector with respect to the screen. This can be done
using two pieces of equally long cord, as illustrated in the
following figure:
It is necessary to check that the position of the two corners
at the front of the projector is centred with respect to the
position of the cords, as illustrated in the figure.
Once you have done this you can be sure that the screen
and the projector are orthogonal and centred, essential
conditions for the best performance.
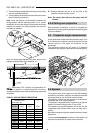
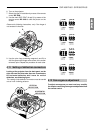
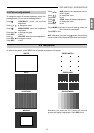
4.7 Optical and electrical adjustments
Turn the projector on with the main switch on the left of
the rear panel; the red pilot light indicates the stand-by
state.
If the projector remains in stand-by press the button
on the remote control or the or arrow buttons on the
rear panel. The green pilot light indicates the projector is
on.
To turn the projector off, press or the main switch.
Proceed with installation using the internal test patterns.
They can be used by pressing TEST on the complete
functions remote control (RC3000) and selecting the most
appropriate test signal.
SCREEN AND PROJECTOR
CENTRE
SCREEN
CORDS OF THE SAME LENGTH
Reference
corner
Reference
corner
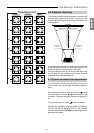
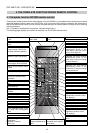
60"
0 0,5
0,2
0,5
0,2
00
0
00
00,5
0,2
0,5
0,2 0
80"
0 0,5 00,500
0 0,5
000,5 0
100"
0 0,3 00,300
0 0,3
000,3 0
120"
0 0,2 00,200
0 0,2
000,2 0
150"
0,2 0,3 0,20,300
0,2 0,3
000,3 0,2
180"
0,2 0,3 0,20,200
0,2 0,3
000,2 0,2
300"
0,2 0,3 0,20,300
0,2 0,3
000,3 0,2
Projections at 0°
GREENBLUE RED