


SVP 450 PLUS - SVD 500 PLUS
17
ENGLISHENGLISH
ENGLISHENGLISH
ENGLISH
- If the measurement of the screen diagonal is not in
the table, C can be determined (in cm) as follows.
- Measure the screen diagonal and take the nearest
value from the table.
- Calculate the ratio between value C and screen width
in the table.
- Multiply the result by the actual screen width.
Example:
Suppose we have a 105” screen diagonal. 100”
is the nearest value in the table.
Ihe C/Width ratio is equal to :305/203.2=1,5.
A105” screen diagonal is 213.3 wide.
So, the value of C is: 1,5x213,3=320 cm.
Note:
The screen size refers to the useful area (4/3
format).
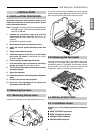
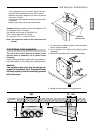
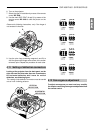
4.3.4 Ceiling front projection
The use of the correct spacers as shown in the
spacers table is mandatory for a perfect focus
uniformity.
Use the ceiling assembly kit (given with the projector) to
install the projector on the ceiling and proceed as follows:
WARNING:
T
he installer must verify that the ceiling can
support the projector load. The bracket must
be fixed properly and be absolutely parallel
with the screen
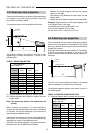
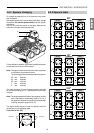
MURO
300
395
115
93 180
266
1- Fix the bracket, included in the pack, to the ceiling with
the four screws supplied.
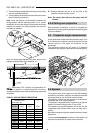
2- Put the projector on a table in the vertical position
(sideways)
3- Fasten the left bracket with 2 screws and washers.
4- Repeat the steps above for the right bracket.
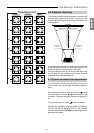
SCREEN
FRONT
300
93
=
=
OBSERVE
PARALLELISM
BRACKET