


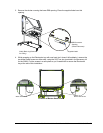
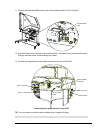
11. Connect the supplied MOD6 cable to the audio amplifier and the X-Port 20 switch.
Supplied MOD6
Cable
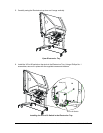
12. Swing the Electronics tray back to its original position, and insert the two button head screws
that you removed earlier. Avoid pinching any cables.
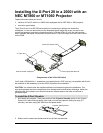
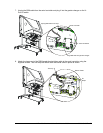
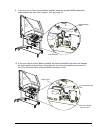
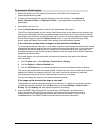
13. Connect the supplied three-cable laptop harness to the rear of the 2000i.
BNC x 5 Cable
Red GreenBlue H
V
BNC Connectors
Serial Cable
DB9 Connector
3.5 mm Audio
Cable
A
udio Amplifier
Connector
Connecting the Laptop Harness to the 2000i
TIP: You may want to bundle the above cables using a supplied tie wrap.
X-Port 20 Switch Installation Guide for the 2000i 99-00486-00 Rev B0
6