4-1
ROUTING SWITCHER SYSTEM (E)
Section 4
Setup Procedure
4-1. Outline
This setup procedure is written for the setup operator to understand the setup procedure, and more
importantly, the philosophy behind the setup. Time spent now, before actually sitting down at the Setup
Terminal will greatly enhance the flexibility of your router system (routing switcher system). If your
system is only comprised of DVS-V**** routing switchers the setup approach is much simpler, and
pretty strait forward. But, if your router system is comprised of more the one type of routing switcher
(AES/EBU, Analog Audio, or Video, Time Code, RS-422A Remote, etc.) it is very important that you
understand what you read in this procedure before you actually start the setup procedure.
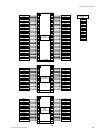
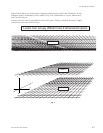
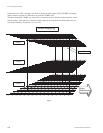
A router system with different types of routing switchers should usually be thought of as a 3 dimensional
object. We will see in this procedure that in a few cases the old 2 dimensional model of a X-Y matrix
switch will do. But, the most flexibility is obtained by thinking of each type of routing switcher as a
separate, and distinct Z layer, or level (see figure 2).
Regarding detailed setup information, refer to the menus explanation in the Installation manuals chapter
on setup.
What we will do in this procedure is to:
1. Identify all in/out signals, and segregate them into 16 types of sources and destinations.
2. Assign virtual inputs, and outputs a “Type + number” name. (numbers start at 001 and go to 512
for both source, and destinations)
3. Assign each output “Type + number” name to one or more levels.
4. Assign each “Type + number” name to an actual physical in/out location.
5. Assign any needed phantoms (also known as “salvos”).
6. Decide which control units can be active on the S-BUS, and displayed in various diagnostic
modes.
7. Decide which inputs won’t be available at selected outputs.
8. Setup any “tie lines” needed.
9. Assign second naming convention (if desired).
10. Setup individual control units on the S-BUS data link.
Regarding steps 1 through 4, these are important steps (with step 2 being the longest, and most critical).
As an introductory explanation, it should be clear that we humans like to deal in names, while the S-BUS
control system deals in numbered labels, which the primary (main routing switcher frame) will translate
into actual physical inputs, and outputs. Many facilities will base the mnemonics used in all documenta-
tion based on the limitations imposed by routing switcher names, and display windows.
For details of setting information, refer to the Section 5.


