


49
C D
’
English
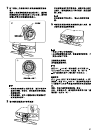
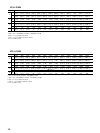
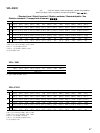
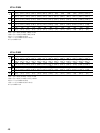
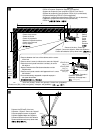
Ceiling Installation
This section describes the examples for installing the projector on
the ceiling. C D
When installing the projector on the ceiling, use the PSS-610
Projector Suspension Support.
For ceiling installation, ask for qualified Sony personnel only.
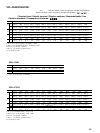
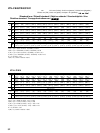
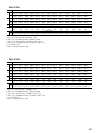
The alphabetical letters in the illustrations, charts and calculation
methods indicate the following.
SS : screen size measured diagonally (inches)
a:distance between the screen and the center of the lens
a’ : distance between the screen and the screw hole (on the lens
side) for the ceiling bracket
b:distance between the ceiling and the center of the lens
c:distance between the ceiling and the surface of the
Suspension Support
when using the PSS-610
using adjustment pipe (b) :
150/175/200 mm (6 / 7 / 7
7
/8 inches)
using adjustment pipe (c) :
250/275/300 mm (9
7
/8 / 10
7
/8 / 11
7
/8 inches)
d: adjustment range of left or right side
x:distance between the ceiling and the center of the screen, free
N:minimum
M:maximum
Français
Installation au plafond
Cette section décrit des exemples d’installation du projecteur au
plafond. C D
Lorsque vous installez le projecteur au plafond, utilisez le support
de suspension pour projecteur PSS-610.
Pour une installation au plafond, adressez-vous uniquement à un
personnel qualifié Sony.
Les lettres figurant dans les illustrations, les tableaux et les
méthodes de calcul indiquent les éléments suivants :
SS : dimension de l’écran en diagonale (pouces)
a: distance entre l’écran et le centre de l’objectif
a’ : distance entre l’écran et le trou de vis (du côté de l’objectif)
pour le support de fixation au plafond
b: distance entre le plafond et le centre de l’objectif
c:distance entre le plafond et la surface du support de
suspension
lors de l’utilisation du PSS-610
utilisation du tube de réglage (b) :
150/175/200 mm (6 / 7 / 7
7
/8 pouces)
utilisation du tube de réglage (c) :
250/275/300 mm (9
7
/8 / 10
7
/8 / 11
7
/8 pouces)
d:plage de réglage du côté gauche ou droit
x:distance entre le plafond et le centre de l’écran, libre
N:minimum
M:maximum
Español
Instalación en el techo
En esta sección se muestran ejemplos para instalar el proyector en
el techo. C D
Para instalar el proyector en el techo, utilice el soporte de
suspensión para proyector PSS-610.
Para realizar la instalación en el techo, solicite asistencia técnica
únicamente a personal especializado de Sony.
Las letras alfabéticas de las ilustraciones, gráficos y métodos de
cálculo indican lo siguiente:
SS : tamaño de pantalla medida diagonalmente (pulgadas)
a: distancia entre la pantalla y el centro del objetivo
a’ : distancia entre la pantalla y el orificio del tornillo (en el lado
del objetivo) del soporte para techo
b: distancia entre el techo y el centro del objetivo
c:distancia entre el techo y la superficie del soporte en
suspensión
cuando se utiliza el modelo PSS-610
uso del tubo de ajuste (b) :
150/175/200 mm (6 / 7 / 7
7
/8 pulgadas)
uso del tubo de ajuste (c) :
250/275/300 mm (9
7
/8 / 10
7
/8 / 11
7
/8 pulgadas)
d:rango de regulación del lado izquierdo o derecho
x:distancia entre el techo y el centro de la pantalla, ajuste
opcional
N:mínimo
M:máximo