


22
The Screen Menu
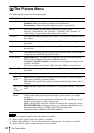
The Screen Menu
For adjusting the size, position, and aspect ratio of the projected image for each input signal.
*1: • Note that if the projector is used for profit or for public viewing, modifying the original picture
by switching to the aspect mode may constitute an infringement of the rights of authors or
producers, which are legally protected.
• Depending on the input signal, setting items for aspect ratio or some other setting items cannot
be set in some cases, or changing the aspect ratio setting may have no effect.
• A part of the image may be displayed in black, depending on the setting item.
*2: Available for VPL-FH36/FH35/FH31/FH30 only.
Setting items Description
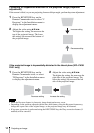
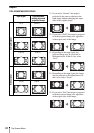
Aspect
*1
Changes the aspect ratio of the projected image. (page 24).
When the
computer
signal is
input
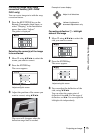
Full1: Displays the image to fit the maximum projected image size without
changing the aspect ratio of the input signal.
Full2: Displays the image to fit the maximum projected image size.
Normal: Displays the image on the center point of the projected image
without changing the resolution of the input signal or enlarging the image.
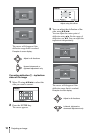
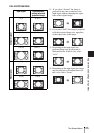
When the
video signal
is input
4:3: Displays the image to fit the maximum projected image size with an
aspect ratio fixed to 4:3.
16:9: Displays the image to fit the maximum projected image size with an
aspect ratio fixed to 16:9.
Full
*2
: Displays the image to fit the maximum projected image size.
Zoom: Display the center point of the projected image to zoom.
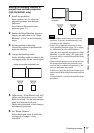
V Center
*2 *3
Adjust the whole projected image by moving up and down on the screen.
As the selected number increases, the screen moves up, and as the selected
number decreases, the projected image moves down.
Vertical Size
*2 *3
Reduces or enlarges the image vertically.
The projected image is enlarged as the setting increases and reduced as the
setting decreases. If the subtitle of a movie, etc. cannot be seen, use this
together with “V Center.”
Over Scan
*3
On/Off: Hides the outline of the image when set to “On.” Select “On” if
noise appears along the edge of the image.
Adjust Signal
*6
Adjusts the image of a computer signal. Use this item if the edge of the
image is cut and reception is bad.
APA
*4 *5
Automatically adjusts the projected image to an optimum quality when you
press the ENTER key.
Phase
*4
Adjusts the dot phase of the display pixel and the input signal. Set to the
value where looks clearest.
Pitch
*4
The higher the setting, the wider the horizontal image elements (pitch). The
lower the setting, the narrower the horizontal image elements (pitch).
Shift
*6
H: The higher the setting, the farther right the image is projected on the
screen. The lower the setting, the image farther left.
V: The higher the setting, the farther up the image is projected on the screen.
The lower the setting, the image farther down.
Notes