


The G90 comes with two manuals. One is an
operator’s manual that describes the basic user
controls and the other an installation manual.
The manuals are reasonably good but they could
have done a bit better job explaining the basic
memory system concepts. The service manual
also left out a key point, failing to note that the status mode
must be on before a specified series of keystrokes will enable
the service mode. I began setting the G90 up on a Saturday
and was stymied by this omission. Fortunately, a quick query
to an Internet newsgroup brought several correct solutions.
Many thanks to those who responded.
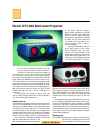
I/O Connections
The G90 includes the usual composite, S-Video, and RGB
inputs. It also includes YPbPr component video inputs for
standard-definition and high-definition sources with both bi-
level and tri-level sync capabilities. This means it will be com-
patible with virtually any video source existing or announced.
There are also two slots on the rear panel for additional I/O
modules, so it can be upgraded for any digital video interfaces
in the future.
The rear panel has an RS-232/422 interface. I put this to
use during my evaluation. The projector I was sent arrived
with version 1.02 firmware, which was missing a grayscale
calibration feature. I received the latest firmware version
(1.11) by email from Sony and downloaded it to the G90 in
less than 30 minutes.
Scan Rates
The G90 is compatible with just about any video format that
exists, including the most advanced scalers and upconvert-
ers. The horizontal scan frequency range is 15-150 kHz, and
the vertical scan range is 38-150 Hz. This also accommodates
a wide range of computer graphic resolutions. The RGB
bandwidth is 135 MHz for displaying the highest resolution
g r a p h i c s .
Installation and Set-up
I always recommend that ceiling mounting and initial pro-
jector set-up be done by professional installers and calibra-
tors. There are serious safety issues when mounting heavy
objects overhead on ceilings, and lethal voltages a r e
found inside projectors and remain stored there even after
they have been unplugged for long periods.
So never open a projector case for any reason.
In addition to safety reasons, projectors should be pro-
fessionally installed because positioning distances and
angles are critical to getting the best performance, indeed
even proper functioning. In ceiling-mounted installations,
it really pays to get it right the first time. It is also essen-
tial that the grayscale color temperature be correctly
adjusted. It’s ludicrous to spend a large sum on a projector
and then try to save a few hundred dollars by avoiding this
critical calibration step. It is pure fantasy to do this adjust-
ment without a sophisticated color analyzer, so be sure
your installer or calibrator has the proper electronic test
e q u i p m e n t .
Your installer will be able to make many mechanical and
electronic calibration adjustments to optimize the picture.
Beyond the standard CRT-Lens alignment and focus adjust-
ments, Scheimpflug adjustments are included for each CRT.
These mechanical adjustments alter the horizontal and ver-
tical tilt of the CRTs to alter the focal plane with respect to
the lens assemblies. This provides optimum focus at all
edges of the picture. After all of the mechanical focusing is
complete, an extensive array of electronic magnetic-focus
adjustments are made from the remote control for nine sep-
arate screen areas. Sony’s new hexapole focus adjustments
produce the small spot size and round shape that are so cru-
cial to the ultra high-resolution performance of the G90.
A complete professional calibration should be done at
the time of installation. That way you know that everything
involved in the installation process has been done correctly
and you are getting the best picture possible from your pro-
j e c t o r. Most current projectors provide picture geometry
and convergence adjustments using a remote control. It will
reward owners to learn how to make those remote control
adjustments to keep the picture in optimum shape, since
some drift is inevitable over time, particularly during the
first year of any projector’s life.
Some High End projectors are available with small
cameras that provide automatic adjustments, but manual
controls must generally be used to fine-tune the results.
The Sony G90 has no automatic adjustment capability, but
its geometry and convergence controls are among the eas-
iest to use and provide a versatile array of capabilities to
get near-perfect results. All the necessary test patterns are
built in, and skew, bow, size, linearity, pincushion, and
keystone adjustments are available for each color and for
different areas of the screen. Then each color can be fine-
tweaked for horizontal and vertical registration at 25 dif-
ferent locations on the display using the Zone adjustment.
The variety of controls, their effectiveness, and ease of use
are exemplary.
Operating Functions
The memory model for accessing different sources and dis-
play formats on the G90 can be a bit confusing at first
glance. The projector has 150 input memories, each storing
identification and calibration information for a particular
type of input signal. An input signal memory is selected
based on the signal scan-rate, signal type (S-Video, RGB,
Y P b P r, etc.) and the input signal port. All signals from a line
quadrupler use one input memory, S-Video signals another,
and so forth. Separate geometry, convergence, and grayscale
information is stored for each input signal type. Then 10
video memories store specific aspect ratio and picture con-
trol information (brightness, contrast, color, etc). When a
signal is input to the projector, the appropriate input memo-
ry is selected automatically. The user then selects one of the
10 video memories for the aspect ratio desired. The 10 video
memories are selected with numbered keys on the remote,
but can be named for on-screen identification with up to 18
characters each. Memories can then be selected by name
using the on-screen menu.
I set up a variety of input memories, including standard
NTSC through the S-Video input, and line-doubled and HDTV
signals through RGB and YPbPr inputs. I created video mem-
ories for 4:3, 4:3 letterboxed, and 16.9 enhanced aspect ratio
formats.
Other features include a picture-orbiting function to
help prevent CRT burns, which can be disabled if desired.
The user can also select between a 3-line-adaptive comb fil-