


To Enable Ethernet Connectivity
79
To Enable Ethernet Connectivity
Your computer comes with a preinstalled Ethernet port. To enable faster start-up
time, your computer may ship with this function disabled. You can enable
Ethernet connectivity by following the instructions below.
Enabling the Ethernet connection
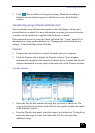
1 Click Start in the Windows taskbar, then select Control Panel.
2 From the Pick a Category list, select Performance and Maintenance.
The Performance and Maintenance dialog box appears.
3 From the Pick a Control Panel icon, select System.
The System Properties dialog box appears.
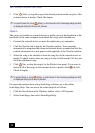
4 Select the Hardware tab, then click the Device Manager button to view the
installed system hardware.
The Device Manager dialog box appears.
5 Click the unfold button in the Network Adapters category to reveal all
installed network devices. Select “SiS 900 PCI Fast Ethernet Adapter.”
6 From menu bar, select Action and then click Properties.
7 Select “Use this device (enable).”
8 Click OK.
9 Close the Device Manager dialog box.
10 Close System Properties dialog box.
11 Close Performance and Maintenance dialog box.
Caution: Your computer has a protective sticker covering the Ethernet
port located on the rear panel. Connect only 10Base-T and 100Base-TX cables
to the Ethernet port. Using other cables or a telephone cable may result in an
electric current overload and can cause a malfunction, excessive heat or fire
in the port. For help on connecting to a network, see your network
administrator.