


SY-6IZA/6IZA-NA
Quick Start Guide
11
Hardware
Installation
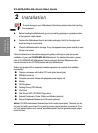
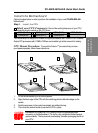
Step 9. External Suspend Button (JP2)
Some cases come with a suspend button, insert the plug into JP2. In addition to through this
button, the system can also enter the suspend mode through your OS.
Note: Suspend mode only functions if your Power Management mode is APM. Make sure that the BIOS
setting for Power Management is APM. Windows 98 can be installed with ACPI Power Management
(default is APM), in this case suspend mode will not function either.
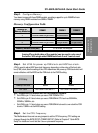
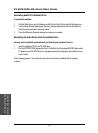
Step 10. Clear CMOS Data (JP5)
Clear the CMOS memory by momentarily shorting pin 2-3 on jumper JP5 for at least 5
seconds, and then by shorting pin 1-2 to retain new settings. This jumper can be easily
identified by its white colored cap.
CMOS Clearing Clear CMOS Data Retain CMOS Data
JP5 Setting
Short pin 2-3 for
at least 5 seconds
to clear the CMOS.
Short pin 1-2
to retain the
new settings.
Note: You must unplug the ATX power cable from the ATX power connector when
performing the CMOS Clear operation.
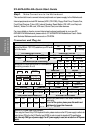
Note on Over-clocking Capability
The SY-6IZA/6IZA-NA Motherboard provides over-clocking capability. Due to the over-
clocking setting your system may fail to boot up or hang during run time. If this occurs,
please perform the following steps to recover your system from the abnormal situation:
1.
Turn off system power. (If you use an ATX power supply, and depending on your
system, you may have to press the power button for more than 4 seconds to shut
down the system.)
2.
Set JP45 to pin 2-3 if you use a FSB 66MHz CPU
3.
Press and hold down the <Insert> key while turning on the system power. Keep
holding down the <Insert> key until you see the message of the CPU type and your
CPU frequency (66MHz x CPU Multiplier) appear on screen.
4.
Press the <Del> key during the system diagnostic checks to enter the Award BIOS
Setup program.
5.
From the BIOS main menu, select [SOYO COMBO SETUP] and move the cursor to
the [CPU Frequency] field to set the proper working frequency.
6.
Select [Save & Exit SETUP] and press <Enter> to save the configuration to the
CMOS memory, and continue the boot sequence.
Note: SOYO does not guarantee system stability if the user over clocks the system.
Any malfunctions due to over-clocking are not covered by the warranty.
3
2
1
3
2
1