


Page 7
English
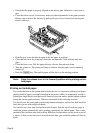
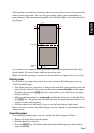
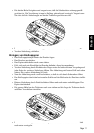
When printing on continuous stationery, take care not to print too close to the perforations
which separate each sheet. This can cause poor quality output, paper misalignment or
paper jamming. The recommended printable area for fanfold paper is shown in the follow-
ing diagram.
If you need to use continuous multi-part forms, use the type which has both side edges
glued together. Do not use forms with more than three parts.
Make sure that the print gap is correctly set for the thickness of paper that you are using.
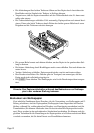
Parking paper
If you want to use single sheets, but do not want to remove the fanfold paper, you can
“park” the fanfold paper.
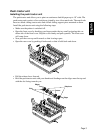
• Tear off the paper at a perforation, so that not more than half a page protrudes above the
paper delivery selector (if necessary, put the printer in not-ready mode and feed paper
through by pressing the [PAPER] key until a perforation is just visible above the paper
delivery selector).
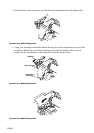
• Make sure that the printer is in ready mode and that the release lever is forward. Press
the [PAPER] key. The printer now automatically feeds the paper backwards until it is no
longer in contact with the platen.
• Push the release lever backwards. Now you can load and print on single sheets.
When you want to resume using fanfold paper, you can “unpark” it as described in the fol-
lowing section.
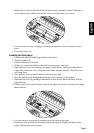
Unparking paper
To resume using fanfold paper, you can “unpark” the fanfold paper as follows:
• Remove all single sheets from the printer.
• Pull the release lever forward.
• Press the [PAPER] key. The printer feeds the parked fanfold paper back into position,
ready for printing.
5 mm
18 mm
18 mm
25.4 mm
25.4 mm
75 mm
Bottom of
Form
Perforation