


3
Installation
WARNING: Hard drives require careful handling, especially when
being transported. If you are not careful with your hard disk, lost data
may result. Always handle your hard drive and storage device with
caution.
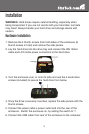
Hardware Installation
Remove the 4 thumb screws from both sides of the enclosure (8 1.
thumb screws in total) and remove the side panels.
Lay the hard drive into the drive tray and connect the IDE ribbon 2.
cable and LP4 molex power connectors to the hard drive.
Turn the enclosure over, or onto it’s side and use the 4 small drive 3.
screws (included) to secure the hard drive from below.
Once the drive is securely mounted, replace the side panels with the 4.
thumb screws.
Connect the power cable a power outlet and into the rear of the 5.
enclosure. Switch the enclosure on, by setting the switch to ‘1’.
Connect the USB cable from rear of the enclosure to the computer.6.