


Instruction Manual
3
About installation
Depending on the version of operating system that you’re currently running and
whether your network connection is active, the docking station might install
automatically or download the proper drivers when the dock is connected to an
available USB port on the host system.
If you receive a prompt to automatically install the driver, complete the on-screen
instructions to complete the installation.
Install the driver
1. On your computer, use a web browser to navigate to http://www.startech.com/
USB3DOCKH2DP.
2. Click the Support tab.
3. Click the driver le and complete the on-screen instructions to download the le.
4. Browse to the location of the driver le that you downloaded and do one of the
following:
If the operating system that you’re using is a version of Windows, run the
DisplayLink “exe” install le.
If the operating system that you’re using is a version of Mac OS, run the
DisplayLink “dmg” install le.
5. Follow any on-screen instructions to complete the driver installation process.
Note: You may be asked to restart your host laptop(s) to complete the installation.
Install the hardware
1. Select the appropriate regional clip for your region and connect the power adapter
to an AC electrical outlet.
2. Connect the power adapter to the DC input on the docking station.
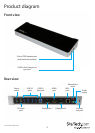
3. Attach the provided USB 3.0 cable to the USB 3.0 port on the docking station and
then to an available USB 3.0 port on the host laptop.
5. Connect your DisplayPort and/or HDMI displays to the corresponding ports on the
docking station.
6. As necessary, connect any other devices to the docking station, including an RJ45
network connection, USB peripherals, a headset, speakers, or microphones.
About USB 3.0 and USB 3.1 Gen 1
USB 3.0 is also known as USB 3.1 Gen 1. This connectivity standard oers speeds up to 5
Gbps.