


Chapter 3 Installing and Extracting the Adapter 15
▼ To Prepare the System for a Cold Installation
1. Before shutting down the operating environment and halting the system, ensure
that all significant application activity on the server has stopped.
2. Follow the appropriate procedures, as documented in the system’s service manual,
to shut down and halt the system.
Refer to the system’s documentation for the complete power off procedure.
3. Power off the system.
Refer to the system’s documentation for the location of the power switch.
4. Verify that the system’s power LED is off (not lit) indicating that the system is
completely powered off.
Once the system has been shut down and powered off, you can safely install the
card.
▼ To Install the Adapter
Note – Refer to the system service or administration guide for detailed instructions
for following tasks.
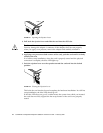
1. Get the antistatic wrist strap from the ship kit.
2. Unwrap the first two folds of the wrist strap and wrap the adhesive side firmly
against your wrist.
3. Peel the liner from the copper foil at the opposite end of the wrist strap and attach
the copper end of the strap to a bare metal area on the front of the server.
4. Remove the card from its antistatic envelope and package and place it on the
electrostatic discharge mat.
If an electrostatic discharge mat is not available, place the card on the antistatic
envelope it was packaged in.
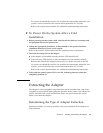
Before installing the card in the system, open the card’s ejection levers (see
FIGURE 3-1).