


6-6
SUPERSERVER 6016XT-TF/6016GT-TF/TF-TM2/TF-TC2 User's Manual
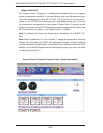
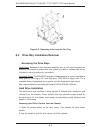
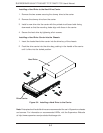
Installing a Hard Drive to the Hard Drive Carrier
1. Remove the two screws securing the dummy drive to the carrier.
2. Remove the dummy drive from the carrier.
3. Install a new drive into the carrier with the printed circuit board side facing
downward so that the mounting holes align with those in the carrier.
4. Secure the hard drive by tightening all six screws.
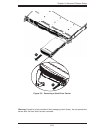
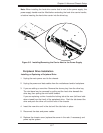
Installing a Hard Drive Carrier Into the Chassis
1. Insert the loaded hard drive carrier into the drive bay of the chassis
2. Push the drive carrier into the drive bay, pushing in the handle of the carrier
until it clicks into the locked position.
Drive Carrier
Hard Drive
Figure 6-4. Installing a Hard Drive to the Carrier
1
4
1
4
Note: Enterprise level hard disk drives are recommended for use in Supermicro chassis
and servers. For information on recommended HDDs, visit the Supermicro Web site
at http://www.supermicro.com/products/nfo/storage.cfm