


- 19 -
USING THE NETWORK SCANNER FUNCTION
2
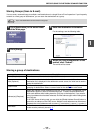
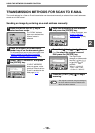
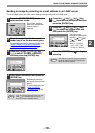
Sending an image by selecting an e-mail address in an LDAP server
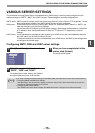
To use an LDAP server, the LDAP server settings must be configured in the Web page.
1
Press the [MODE SELECT] key to
select scanner mode.
The "SCAN" indicator
lights up to indicate that
scanner mode is
selected.
2
Place the original in the document
feeder tray or on the document glass.
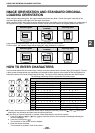
For information on how to place the original, see
"IMAGE ORIENTATION AND STANDARD
ORIGINAL LOADING ORIENTATION" (p.20).
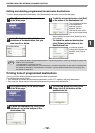
3
Press the [ ] key ( ) or [ ] key
( ) to select "GLOBAL ADDRESS"
and then press the [ENTER] key.
4
Enter search characters and press the
[ENTER] key.
Destinations matching
the search characters will
appear.
To enter characters, see
"HOW TO ENTER
CHARACTERS" (p.20).
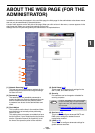
5
Press the [ ] key ( ) or [ ] key
( ) to select the destination and then
press the [ENTER] key.
6
Press the [ ] key ( ) or [ ] key
( ) to select the original size, and
then press the [ENTER] key.
The original size
changes as follows each
time the [ ] key ( )
or [ ] key ( ) is
pressed:
"8.5x11"→"8.5x5.5"
→"A4"→"B5"→"A5"
→"8.5x14"→"8.5x13".
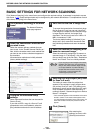
7
Press the [START] key ( ) to begin
scanning.
If you do not know the exact name, you can
enter " " for characters that you do not
know to conduct a wildcard search.
SCAN USING:
GLOBAL ADDRESS
GLOBAL ADD. SEARCH
S
Note
The original is scanned using the settings of
the scan mode that has the "Default Scan
Mode" checkbox selected.
ORIG. SIZE ENTER
8.5X11
Note