


4. SET UP PROCEDURE
4.2 Setting up the Printer
4-4
SPAA-207-R1
4.2 Setting up the Printer
CAUTION!
1. Place the printer on a flat, stable surface.
2. Do not place the printer close to a heater or where it may be exposed to direct sunlight.
3. Avoid locations where the printer may be exposed to high temperature, high humidity or dust.
4.Care must be taken that no condensation occurs in the printer. If it should, however,
do not turn ON the power until the condensation is dried.
5. Use a grounded electrical outlet. Do not use an adapter plug.
6. Be sure that there is adequate room around the printer for easy operation and maintenance.
7. Keep your work environment static free.
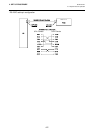
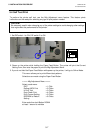
1) Make sure that the printer power is turned OFF.
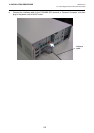
2) Connect the interface cable to the printer.
3) Insert the power cord into the AC inlet.
4) Connect the interface cable to a TOSHIBA POS terminal, and plug in the power cord to the AC
outlet.
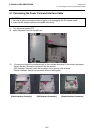
5) If a drawer is desired to be connected, connect the drawer interface cable to the printer.
6) Secure the drawer ground wire to the ground terminal on the rear of the printer.
7) Turn the printer power ON.
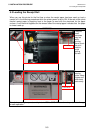
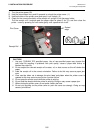
8) Open the printer cover.
9) Load the receipt roll into the printer.
10) Close the printer cover. One receipt will be automatically issued.
11) Check the print quality by performing a self test print.
Now the printer is ready for printing.
NOTES:
1. For details of the above Steps 1) to 4), refer to Section 5.1 Connecting the Power Cord and
Interface Cables.
2. Steps 5) and 6) are the procedures of the drawer connection. For details of Steps 5) and 6),
refer to Section 5.2 Connecting the Drawer.
3. For details of Steps 8) to 10), refer to Section 5.3 Loading the Receipt Roll.
4. For details of Step 11), refer to Section 5.4 Self Test Print.