


10
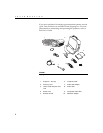
Setting up the Projector
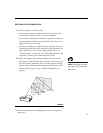
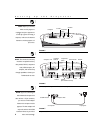
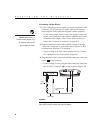
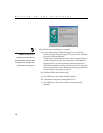
Using the optional enhanced connectivity module
NOTE: If you have turned Auto
Source off (page 31), you may
need to press the source button on
the keypad more than once to
display an active source. The
sources switch in this order:
PC 1-Analog, PC 1-Digital,
PC 2-VESA, Video 3-Component,
Video 1 S-Video, and Video 2-
Composite.
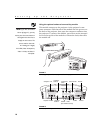
7KLVPRGXOHFRQQHFWVWRWKHSURMHFWRUYLDWKHSURMHFWRU·VFRP
SXWHUFRQQHFWRU6OLGHWKHWDEVLQWKHPRGXOHLQWRWKHJURRYHVRQ
WKHEDFNRIWKHSURMHFWRUWKHQSUHVVWKHFRPSXWHUFRQQHFWRULQWR
WKHSURMHFWRU7RUHPRYHWKHPRGXOHSUHVVGRZQRQWKHWH[WXUHG
OHYHURQWKHWRSOHIWRIWKHPRGXOHWRUHOHDVHWKHODWFKWKHQVOLGH
WKHPRGXOHRII
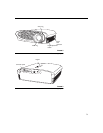
F
IGURE
11
Connecting the optional connectivity module to the projector
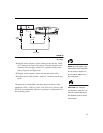
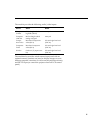
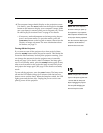
F
IGURE
12
Connector panel on optional enhanced connectivity module
S-video
composite
video
wired remote
computer 1-M1
computer 2-VESA
component
video
monitor
RS-232
audio in
(for all video sources)
computer
audio in
computer
audio in