


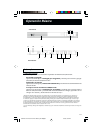

7
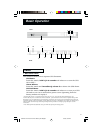
Other UPS Features
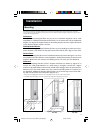
7. AC Receptacles (Battery Backup Supported)
These receptacles provide your connected equipment with AC line power during
normal operation and battery power during blackouts and brownouts. They also
protect your equipment against damaging surges and line noise. Connect com-
puter, monitor and other essential equipment to these receptacles.
8. AC Receptacle (Surge-Only)
This receptacle provides equipment that does not require battery backup (such
as printers) with complete surge and line noise protection. Do not connect
computers or other essential equipment to this receptacle.
9. “SMART” RS-232 Port
The RS-232 port connects your UPS to any PC or workstation. Use with Tripp Lite
software and cabling to monitor and manage network power and automatically
save open files and shut down equipment during a blackout. This port uses
RS-232 communications to transmit UPS and power conditions.
10. Accessory Slot
Contact Tripp Lite Customer Support for more information and a list of available
SNMP, network management and connectivity products.
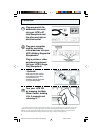
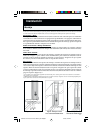
11. Mounting Brackets
The mounting brackets are already set for mounting in standard 19 in. racks.
See Installation section for using the mounting brackets to suit under-monitor,
tower and wallmount applications.
12. AC Inlet Receptacle
Connect one end of the detachable line cord into this receptacle and the other end
into your wall outlet.
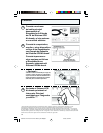
13. Battery Replacement Door
Under normal conditions, the original battery in your UPS will last several years.
Battery replacement should be performed only by qualified service personnel.
Refer to “Battery Warnings” in the Safety section. When replacing batteries,
qualified service personnel should follow this procedure: 1) turn UPS OFF; 2)
remove the snap-on battery replacement door, on left front of unit; 3) pull
batteries partially out of case; 4) make a detailed sketch of the batteries and the
polarity, color and connection of all cables; 5) disconnect battery terminals; 6)
dispose of used batteries; 7) reconnect replacement batteries exactly as original
batteries were; 8) push batteries back into case and replace cover.*
* You may not receive full runtime until your replacement batteries have fully charged.
9904216 Smart 450 RT Owners Manual [120 Volt].p65 3/13/00, 3:02 PM7