


16
OSD Functions
OSD functions are used to configure and control the OSD. You can:
• rapidly switch to any port
• scan selected ports only
• limit the list you wish to view
• designate a port as a Quick View Port
• create or edit a port name
• make OSD setting adjustments.
To access an OSD function:
1) Either Click a Function Key field on the screen, or press a Function Key on the keyboard.
2) Make your choice in the sub-menus that appear by either Double Clicking it, or moving the Highlight
Bar to it, then pressing [Enter].
3) Press [Esc] to return to the previous menu level.
F1 Go To (GOTO)
Click the F1 field or press [F1] to activate the GOTO function. GOTO allows you to switch directly to a
port either by keying in the port’s Name, or its Port ID.
• To use the Name, enter [1]; key in the port’s Name; then press [Enter].
• To use the Port ID, enter [2]; key in the Port ID; then press [Enter].
Note: A partial Name or Port ID can be entered. The screen will show all the computers that match the Name or Port ID pattern AND
that the User is allowed to access (see SETACCESSIBLE PORTS, page 18. This disregards the current List settings (see F2 LIST, below,
for details).
To return to the OSD Main Menu without making a choice, press [Esc].
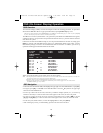
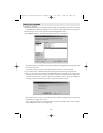
F2 List Ports (LIST)
This function lets you tailor the list of ports the OSD will display on the Main Screen. Many OSD functions
will only operate on computers selected from the Listing on the Main Screen using this function. The submenu
choices and their meanings are given in the table below:
* These items only show up on the Administrator’s screen, since only the administrator has Quick View setting rights (see SET QUICK VIEW
PORTS, page 18, for details).
Move the Highlight Bar to the desired choice and press [Enter]. An icon appears next to the choice to indicate
that it the one currently selected.
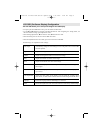
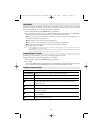
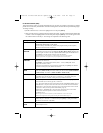
Heading Explanation
SN-PN This column lists the Port ID numbers (Station Number - Port Number) for all the CPU
ports on the installation. The simplest method to access a particular computer is move the
Highlight Bar to it, then press [Enter].
QV An arrow in this column indicates that the corresponding port is selected for Quick View
scanning (see Set Quick View Ports, page 18).
A Sun symbol in this column indicates that the corresponding computer is both powered
On and On Line.
NAME If a port has been given a name (see Edit Port Names, page 18), its name appears in this column.
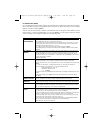
Choice Meaning
ALL Lists all of the ports on the installation.
POWERED ON Lists only the ports that have their attached computers Powered On.
QVIEW* Lists only the ports that have been selected as Quick View Ports
(see SET ACCESSIBLE PORTS, page 19)
QVIEW + POWERED ON* Lists only the ports that have been selected as Quick View Ports (see SET QUICK
VIEW PORTS, page 18), and that have their attached computers Powered On.
OSD Main Screen Headings
200707121 93-2463 KVM Switch Update.qxd 7/31/2007 2:44 PM Page 16