


3
A
B
G
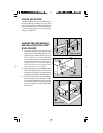
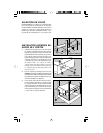
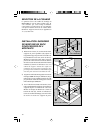
SUGGESTED RACKMOUNT
INSTALLATION FOR 2-POST
ENCLOSURES
1) Attach the support brackets (A) to both rack
posts (B) with user-supplied rack bolts (C).
2) Attach mounting ears (D) to the mounting holes
on the middle of the Battery Pack's sides (E),
using the screws and washers provided (F). Do
not attach the mounting ears to the Battery
Pack's front mounting holes.
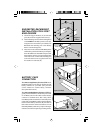
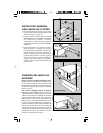
3) Have one or more assistants lift the Battery Pack
and hold it in position until this step is complete.
Insert the UPS into its intended rack space until
the mounting surfaces of its ears meet the back
of the rack's rails. Connect the mounting ears
to the rails with two user-supplied screws and
flat washers on each side (G).
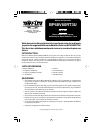
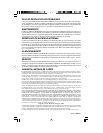
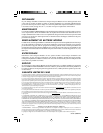
BATTERY PACK
CONNECTION
To connect a single Battery Pack to a UPS: Insert
the Battery Pack's power cable (A) into the external
battery connector of your UPS. (See your UPS
owner's manual for external battery connector
description and location.)
To connect multiple Battery Packs to a UPS: For
greatly increased runtime, connect the power cable
of one Battery Pack to the UPS's external battery
connector as outlined above, then "daisy chain"
more Battery Packs onto the first. Connect the power
cable of the second Battery Pack to the first Battery
Pack's external battery connector (B), the cable on
third to the connector on the second and so on. Note
that multiple Battery Pack arrays will provide longer
runtimes, but will also require longer recharge times.
B
A
C
F
D
E
Figure 1
(2-Post)
Figure 2 (2-Post)
Figure 3 (2-Post)
Battery Connection