


8
3.
This system is NOT designed to be installed as a replacement for a vehicle battery.
4. Vehicles that have on-board computerized systems may be damaged if vehicle
battery is jump-started. Before jump-starting this type of vehicle, read the
vehicle owner’s manual to confirm that external-starting assistance is advised.
5. Excessive engine cranking can damage the vehicle’s starter motor. If the engine
fails to start after the recommended number of attempts, discontinue jump-start
procedure and look for other problems that may need to be corrected.
6. This VECTOR
®
jump-starter is equipped with a manual ON/OFF switch. Once
the connections are properly made, turn the switch ON and you are ready to
jump-start the vehicle.
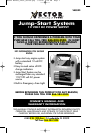
2.1 JUMP-STARTING INSTRUCTIONS
This jump-starter is equipped with an manual safety switch that only allows
jump-start energy to flow when proper connections are made to battery and
frame.
Connect – Red clamp first, then black clamp.
Disconnect – Black clamp first, then red clamp.
1. Make sure jump-start system’s ON/OFF power switch is turned to OFF
2. Turn OFF vehicle ignition and all accessories (radio, A/C, lights, cell
phone, etc.). Place vehicle in “park” and set the emergency brake.
3. Remove jumper clamps from clamp tabs.
4. Procedure for jump-starting a NEGATIVE GROUNDED SYSTEM
NEGATIVE BATTERY TERMINAL IS CONNECTED TO CHASSIS, (MOST
COMMON)
4a. Connect positive (+) red clamp to vehicle battery’s positive terminal.
4b. Connect negative (-) black clamp to chassis or a solid, non-moving,
metal vehicle component or body part. Never clamp directly to
negative battery terminal or moving part.
5. Procedure for jump-starting POSITIVE GROUND SYSTEMS (NOTE: In the
rare event that the vehicle to be started has a Positive Grounded System
(positive battery terminal is connected to chassis) replace steps 3a and
3b above with steps 4a and 4b, then proceed to steps 6 through 8
below.
5a. Connect negative (-) black clamp to vehicle battery’s negative terminal
5b. Connect positive (+) red clamp to vehicle chassis or a solid, non-
moving, metal vehicle component or body part. DO NOT CLAMP
DIRECTLY TO POSITIVE BATTERY TERMINAL OR MOVING PART.
6. Be sure jump-starter’s positive and negative clamps are properly
connected to batter
y.
7. Turn jump-starter safety switch to ON.
8. Start vehicle (do not turn key for longer than 5-6 seconds).
9.
After vehicle star
ts, remove clamps (disconnect the frame or engine
clamp first, followed by the battery cable) and replace them on the built-
in clamp tabs. Squeeze the handles and slide the clamp into position
and release your grip.
VEC022 Manual_Final_073106.qxp 7/31/06 6:36 PM Page 8