MENU DESCRIPTION AND NAVIGATION
20
While each of the picture quality adjustments can be set to suit the needs of the user, there is a ‘proper’ way to set the
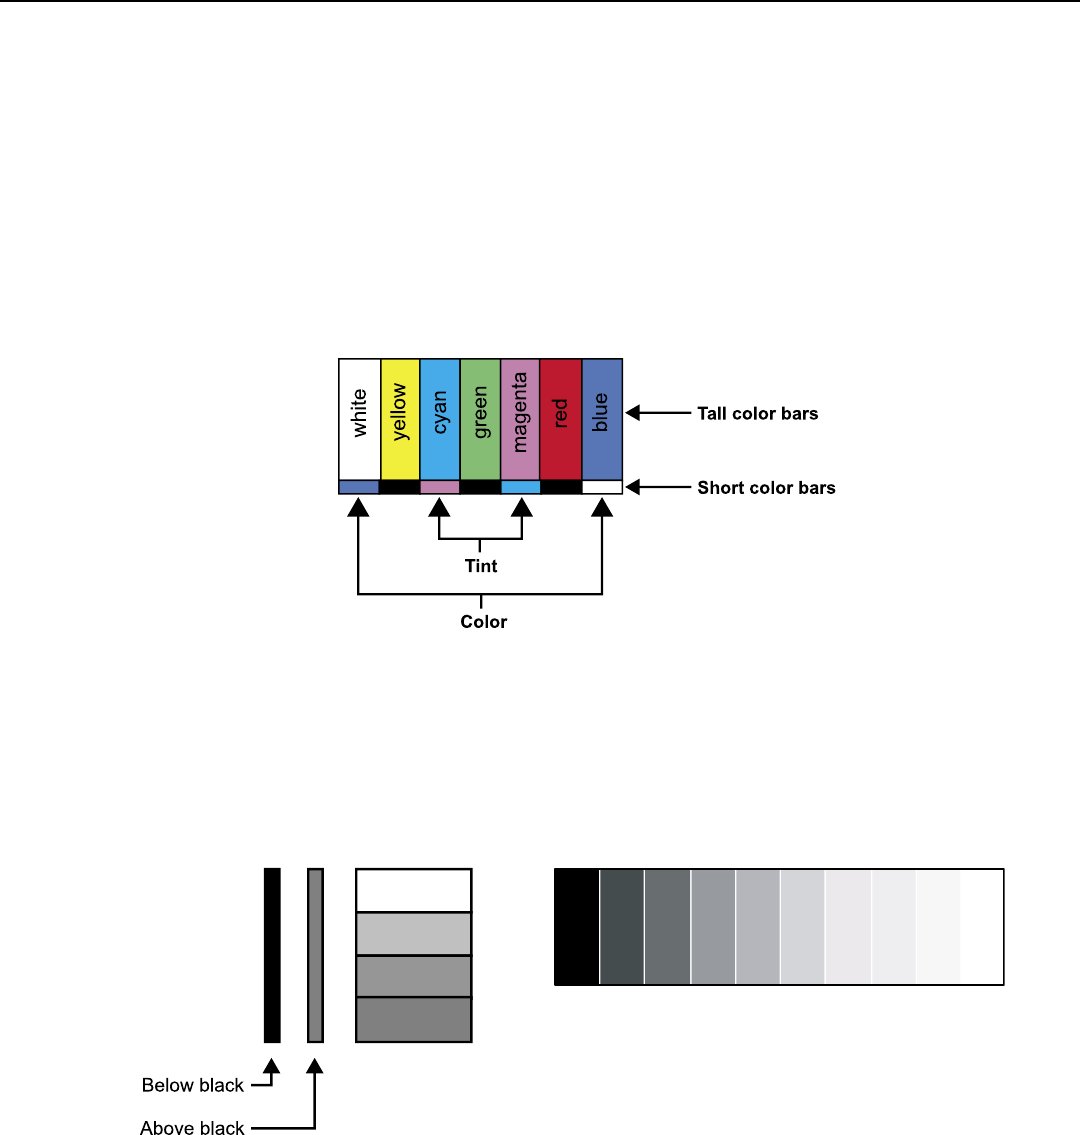
adjustments. For setting TINT and COLOR, please refer to the color bar test
pattern below.
TINT (also known as ‘hue’) is essentially the ratio of red to green in the color portion of the image. If TINT is decreased,
the image will appear redder, and increasing it will cause the image to appear greener. To set TINT properly, look at the color
bar pattern through a blue lter (or mute the red and green outputs). Adjust TINT until the middle two tall color bars (labeled
as “cyan” and “magenta”) to match the middle short color bars (see color bar drawing below).
COLOR (also known as ‘saturation’) increases or decreases the amount of color in the image. To set COLOR properly, look
at the color bar pattern through a blue lter (or mute the red and green outputs). Adjust COLOR until the outer two tall color
bars match (labeled as “white” and “blue”) to the outer short color bars (see color bar drawing below).
BRIGHTNESS adjusts the black level of the image. To adjust this properly, adjust BRIGHTNESS until the ‘below black’
bar JUST disappears, but the ‘above black’ bar is still barely visible (see lower left chart).
NOTE: Some DVD players cannot pass the ‘blacker than black’ bar (they won’t pass PLUGE), and that bar will never be
visible. In a case like this, adjust the ‘above black’ bar until it is slightly brighter than the background that surrounds it.
CONTRAST adjusts the white level of the image. For Fixed-pixel displays, adjust contrast until there is a distinct denition
between the two brightest bars.
NOTE: For best results, Vidikron recommends that CONTRAST be set to ‘0’ or very close to it.
(see lower right chart).
SHARPNESS adjusts the amount of high-frequency detail in the image. This can be adjusted to the preference of the user.
Keep in mind that when SHARPNESS is decreased, ne details in the image will become ‘soft’; when it is increased, ne
details will become sharper but will also make the picture appear ‘noisy’ if adjusted too high.
All the picture adjustments (contrast, brightness, color, tint and sharpness) must be saved manually to Custom 1 or Custom 2
under ISF presets menu. If not, all the picture adjustments will be whited out when ISF presets (ISF Night, ISF Day, Custom
1, Custom 2) are changed.
