9
E
N
G
L
I
S
H
ViewSonic VP181 ViewPanel
®
Getting Started
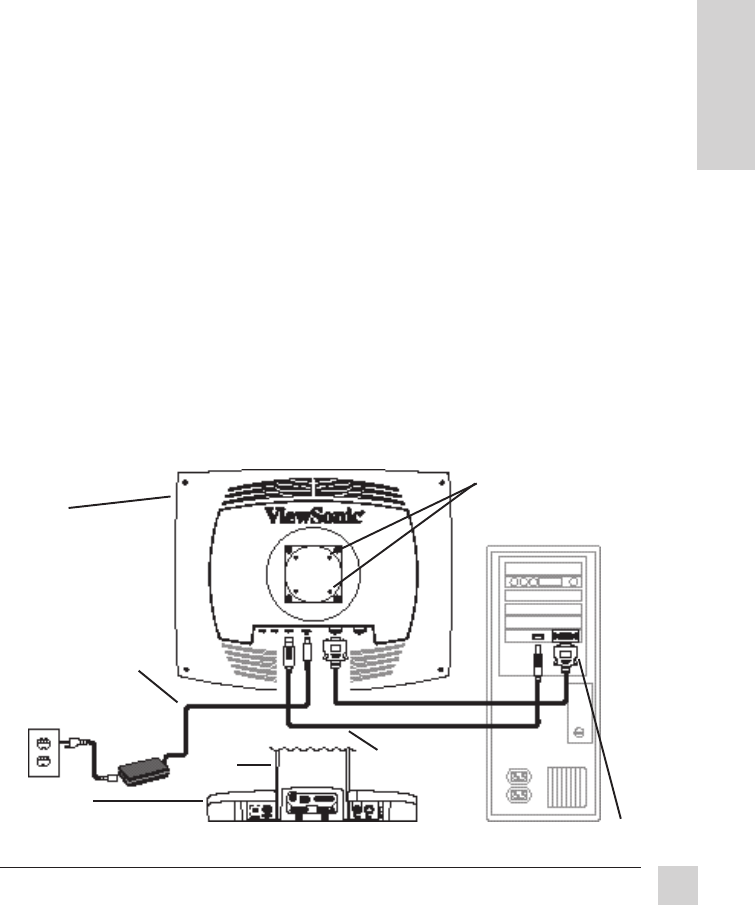
Installation-Wall Mount
A wall installation includes a digital data connection (CPU) and a USB connection (optional). The
VP181 is compatible with the VESA wall mounting standard. For information concerning how to
obtain a wall mounting kit, contact ViewSonic
®
or your local dealer.
To convert the desk-mounted VP181 to a wall-mount installation, do the following:
1 Disconnect DC power
Disconnect the DC power supply
from the base of the ViewPanel
(see steps 3 and 4, page 6) and
connect to the ViewPanel head
(see step 1 in figure below).
2 Raise ViewPanel to
maximum height
3 Remove plastic cap cover
Remove the plastic cap cover
at the top of the VP181 neck.
4 Remove plastic cover from
back of ViewPanel head
Remove the circular-shaped
plastic cover from the back of the
ViewPanel head exposing the
mounting screws.
5 Disconnect panel from neck
Disconnect the panel from the
neck by removing the four
screws on the back of the
ViewPanel.
6 USB Installation (optional)
DC power
supply(step 1)
USB cable
(step 6)
• Remove the USB cable
connecting the base to the
head (see step 1, USB
Installation, page 8).
• Connect the USB cable from the
computer to the USB IN port on
head of the ViewPanel.
7 Disconnect DFP cable from
base
Disconnect the short digital flat
panel (DFP) cable that connects
the base of the ViewPanel to the
head (see step 2, page 7).
8 Connect DFP cable from
computer
Connect the digital flat panel
(DFP) cable from the computer to
the head of the ViewPanel.
9 Attach ViewPanel to wall kit
Mount the ViewPanel head on the
wall using a VESA-compliant wall
mount. NOTE: To order a wall
mounting kit, contact ViewSonic.
Head
DFP cable
(step 8)
Base
Neck
Mounting
screws (steps 4
and 5)
