


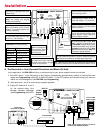
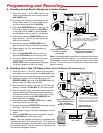

B. Recording from a Tape, CD Player or Any Line Level Source (PC sound card, etc)
1. Place DIP switch 1 in the OFF position and disconnect
any background music source from the Aux Audio input.
2. Set the volume on the tape/CD player to a middle setting.
3. Connect the output from the Tape/CD player to the
RECORD AUDIO input jack of the DVA-2WA using the
double ended 1/8” audio cord provided.
4. Slide the Play/Rec switch to the right, the LED will light
steady to indicate the DVA-2WA is in the record mode.
5. Start the tape/CD player and monitor when to start and
stop the recording by listening through the speaker(s)
connected to terminals 3 and 4 or monitor with a hand-
set connected to the handset REC/MONITOR jack
(mouthpiece will be disabled).
6. Momentarily press the START/STOP button to begin
recording. The LED will flash fast.
7. Momentarily press the START/STOP button again to stop
recording. The LED will light steady.
8. Repeat steps 5 through 7 for each message you wish to
record.
9. Slide the PLAY/REC switch to the left position to place
the DVA-2WA back into the play mode.
Notes: If the total available record time is surpassed while
recording, the status LED will pulse hi/lo. To re-record all
user-recorded messages, move the switch to play then back
to the record position. This will allow you to record over all
the previous messages in memory.
OFF
1
VIKING
©
MODEL DVA-2WA
VIKING
ELECTRONICS
HUDSON, WI 54016
DIGITAL ANNOUNCER
WITH 2 WATT AMPLIFIER
POWER 12V DC
STATUS LED
120V AC
AUX. AUDIO
INPUT/MOH
RECORD AUDIO
INPUT (MIC/TAPE)
HANDSET
REC/MONITOR
START/STOP
DEFAULT MSG.
MESSAGE REPEAT
DELAY TIMES
1234
REMOTE TRIGGER
(STRAP TO REPEAT)
12
SPEAKER
OUTPUT
34
600 OHM AUDIO
OUTPUT
MASTER
VOLUME
AUX. AUDIO
VOLUME
-or- -or-
MIN MAX
MIN MAX
Tape Player
(not included)
CD Player
(not included)
PC Sound Card
(not included)
Optional handset for moni-
toring recordings. Viking
part # Q171030 or
equivalent (not included)
REC
Double ended 1/8”
audio cord included.
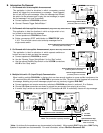
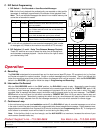
1. Place DIP switch 1 in the OFF position and
remove any background music source from the
AUX AUDIO input.
2. Connect the 1/8” Electret microphone plug to the
Record Audio input or connect a carbon hand-
set to the modular jack of the DVA-2WA.
3. Slide the PLAY/RECORD switch to the right, the
LED will light steady to indicate the DVA-2WA is
in the record mode. Note: To avoid feedback,
turn the Master Volume control to “min” position.
4. Momentarily press the START/STOP button to
begin recording. The LED will flash fast to indi-
cate you are recording.
5. Momentarily press the START/STOP button
again to stop recording, the LED will light steady.
6. Repeat steps 4 and 5 for each message you
wish to record.
7. Slide the PLAY/RECORD switch to the left to
place the DVA-2WA back into the play mode.
8. Turn up the Master Volume control and review
recording(s) by momentarily pressing the
START/STOP button and listening to messages
in handset, speakers or 600 ohm output.
OFF
1
VIKING
©
MODEL DVA-2WA
VIKING
ELECTRONICS
HUDSON, WI 54016
DIGITAL ANNOUNCER
WITH 2 WATT AMPLIFIER
POWER 12V DC
STATUS LED
120V AC
AUX. AUDIO
INPUT/MOH
RECORD AUDIO
INPUT (MIC/TAPE)
HANDSET
REC/MONITOR
START/STOP
DEFAULT MSG.
MESSAGE REPEAT
DELAY TIMES
1234
REMOTE TRIGGER
(STRAP TO REPEAT)
12
SPEAKER
OUTPUT
34
600 OHM AUDIO
OUTPUT
MASTER
VOLUME
AUX. AUDIO
VOLUME
MIN MAX
MIN MAX
Note: If the total available record time is surpassed while record-
ing, the status LED will pulse hi/lo. To re-record all user-record-
ed messages, move the switch to play then back to the record
position. This will allow you to record over all the previous mes-
sages in memory.
A. Recording from an Electret Microphone or Carbon Handset
Carbon Handset Viking part #
Q171030 or equivalent
(not included)
Electret Microphone with 1/8” jack,
Radio Shack Part #33-3014 or
equivalent (not included)
- or -
REC
P
P
r
r
o
o
g
g
r
r
a
a
m
m
m
m
i
i
n
n
g
g
a
a
n
n
d
d
R
R
e
e
c
c
o
o
r
r
d
d
i
i
n
n
g
g
Play/Rec Switch
Play/Rec Switch
Earth Ground
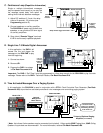
If you experience hum during the playback of
user-recorded messages, earth ground Speaker
Output terminal 3 and re-record messages.
If you experience hum during the
playback of user-recorded mes-
sages, earth ground Speaker Output
terminal 3 and re-record messages.
Earth Ground