VXI Technology, Inc.
32 CT-100C Installation
ACRYLIC RACKMOUNT DOOR KIT INSTALLATION
An acrylic rackmount door is offered as an alternative to the aluminum rackmount door. The kit
(Option 65) provides the necessary hardware to install a 1/8” thick acrylic door in front of the
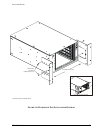
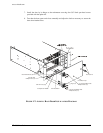
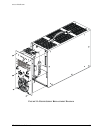
rackmounted chassis. An installation diagram is provided on the following page for ease of
assembly. This option requires that the rackmount ear kit also be installed and configured for
recessed mounting.
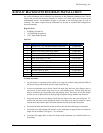
Required Tools
1. #2 Phillips Screwdriver
2. 1/8" Flat Blade Screwdriver
3. 11/32" Open Ended Wrench
Parts List
QTY ITEM VTI P/N
2 Screw, 6-32 x 1/2" Pan Head Phillips, Sems Zinc 37-0028-050
2 Nut, Hex, 6-32, Zinc/Steel 37-0030-632
1 Latch, Vise Action, Knob Style, Black 37-0065-000
2 Hinge, Adjustable Damping, Black 37-0066-000
4 Screw, 8-32 x 3/8" Pan Head Phillips, Black Oxide 37-0079-037
1 Stop, Front Door, CT-100C 41-0133-000
1 Door, Front, CT-100, Acrylic 41-0303-000
2 Brace, Rackmount, CT-100C 41-0136-000
4 Nut, Hex, 8-32, Zinc/Steel 37-0030-832
4 Washer, Split Lock, 8-32 Zinc 37-0013-008
4 Washer, Flat 8-32, Zinc 37-0012-008
4 Screw, 8-32 x 1/2" Pan Head Phillips, Black Oxide 37-0079-050
4 Screw, 8-32 x 3/8" Flat Head Phillips, Zinc 37-0080-037
Assembly Procedure
1. Lay the chassis on a protected work surface on its long side with the voltage monitor LEDs of
the chassis facing front with the power switch toward the top.
2. Locate two rackmount (cross) braces. Install one each along the front of the flanges (one on
top and one on the bottom) using four (two ea.) #8 flathead screws. The lip along the long
edge of each brace goes toward the front and pointing inside. The braces fit over the flanges
and the screws are placed from the inside going through the flange and then into the brace.
3. Locate the front door and two hinges. Install the two hinges to the front door using four 1/2”
black oxide pan head screws through the holes of the hinge with the flat washer in contact
with the door and with the split lock washer between the hex nut and the flat washer.
4. Locate the latch kit and install it into the door from the side where the hinges are mounted.
5. Locate the door latch bracket and install it on the rackmount ear opposite the end where the
hinges will be installed. Use
Figure 1-7 as a reference.
6. Locate the four tapped holes on the front surface of the rackmount ear to which the door is to
be attached.


