


Chapter 5
6
In order to configure Wasp WLR8900/8905 Scanners, you must familiarize
yourself with the setup procedures on the following pages. The default
settings of the Wasp WLR8900/8905 Scanners are identified on each page
and clearly marked using an asterisk (*). The default settings have been
preprogrammed for the most common barcode configurations. Use the
Setup & Configuration only to customize the Wasp WLR8900/8905
Scanners settings. If you need to configure the scanner, the default
settings will be overwritten. All the programmed settings are stored
permanently in non-volatile memory; therefore, your configuration will be
maintained even if the keyboard power to Wasp WLR8900/8905 Scanners
is removed by turning off your PC.
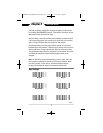
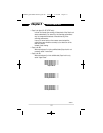
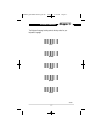
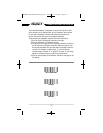
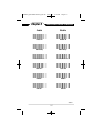
In order to configure Wasp WLR8900 Series Scanners,
two basic steps need to be followed:
(1) Locate the group that contains the options to be changed.
(2) Scan the barcode representing the option to be changed.
The scanner will sound two beeps.
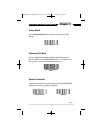
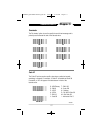
To change Minimum/Maximum Length:
(1) Scan the Minimum or Maximum Length barcode.
(2) Scan a 2 digit value from the ASCII table on pages 32-35
(3) Scan the Minimum or Maximum Length barcode again.
Example: To have a minimum length barcode of 1, you must scan a
0 then 1, then scan the minimum barcode again. To have a maximum
length barcode of 10, you must scan a 1 then 0, then scan the
maximum barcode again.
Setup & Configuration
WLR8900_8905Manual0308_sm.A0 6/25/08 3:38 PM Page 6