


5-34
Basic Configuration
5.6.2. Adding Plug Groups
The "Add Plug Group to Directory" option allows you to create new Plug Groups and
assign plug access rights to each group. Note that the Add Plug Group function is only
available when you have accessed command mode using a password that permits
Administrator Level commands. To create new Plug Groups, proceed as follows:
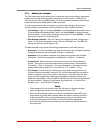
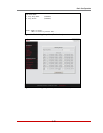
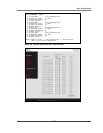
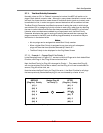
• Text Interface: Type /G and press [Enter] to display the Plug Group Directory
menu. From the Plug Group Directory menu, type 2 and press [Enter]. The MPC
will display the Add Plug Group menu as shown in Figure 5.7.
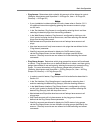
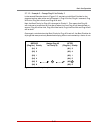
• Web Browser Interface: Click the "Plug Group Directory" link on the left hand
side of the screen to display the Plug Group Directory menu. From the Plug Group
Directory menu, click the "Add Plug Groups" link to display the Add Plug Group
menu as shown in Figure 5.8.
The Add Plug Group Menu can be used to define the following parameters for each new
account:
• Plug Group Name: Assigns a name to the Plug Group. (Default = undefined.)
• Plug Access: Determines which plugs this Plug Group will be allowed to control.
(Default = undefined.)
Notes:
• If your installation includes optional AUX units, please refer to Section 5.6.2.1
for additional instructions regarding granting plug group access to plugs on
AUX units.
• In the Text Interface, Plug Access is configured by selecting item 2 and then
selecting the desired plugs from the resulting submenu.
• In the Web Browser Interface, Plug Access is configured by selecting the
desired plugs from a list of all plugs in the Add Plug Group menu.
• After you have finished defining or editing Plug Group parameters, make
certain to save the changes before proceeding. In the Web Browser
Interface, click on the "Add Plug Group" button to save parameters; in the
Text Interface, press the [Esc] key several times until the MPC displays the
"Saving Configuration" message and the cursor returns to the command
prompt.