


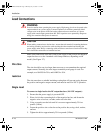

AC Input Power
TM-XDOP-01XN 2–11
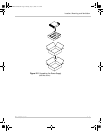
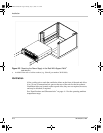
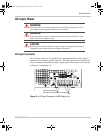
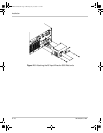
AC Wire Input Connection for 12000 W
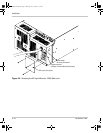
See Figure 2-6 on page 2–12.
To connect the 12000 W AC input wires:
1. Ensure that the AC input cord is de-energized, and that the power switch on
the front of the power supply is OFF.
2. Strip approximately 2.75 in. (70 mm) from the jacket of the AC wire. Strip
0.55 in. (14 mm) at the end of each wire.
3. Remove the square AC input cover plate from the AC input bracket on the
rear panel, and a round knock-out from either the rear or right side of the
bracket.
4. Insert the AC input cable through the knock-out and through the removable
nut from the strain relief until there is enough cord to attach the AC wires to
the terminal block (the nut must be inside the AC input bracket). Tighten the
cable clamp screws and the strain relief nut inside the AC input bracket until
the AC input wire is firmly held between the nut and the cable clamp screws.
5. Insert the ground wire (green) 0.55 in. (14 mm) into the left-most terminal
location, and tighten securely.
6. Route the AC wires to the input terminal block by connecting the red, black,
and white wires to the remaining 3 cable clamp connectors. There is no set
order for connecting the wires. Any of the 3-phase wires can be connected to
any of the 3 line input connectors. To connect each wire, loosen the terminal
screw, insert the stripped wire 0.55 in. (14mm) into the terminal, and tighten
the screw securely.
7. Reinstall the AC input cover plate.
8. Connect the free end of the cable to the AC source, checking that the voltage
is within the approved input range for the supply.
9. Energize the AC input.
It is now safe to turn the power supply on.
TM-XDOP-01XN.book Page 11 Monday, July 17, 2006 11:19 AM