


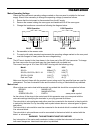


Current Calibration
Switch output OFF. Set output voltage to nominally 2V. Set current control to minimum. Connect
the DMM (set to Amps) and load in series across the output. Switch output ON.
Adjust VR8/108 (offset compensation of current control error amp) for a reading of 0·003A
± ·001A on the DMM. Check that the CC LED is ON.
Increase voltage controls and current control to maximum. Adjust load until the DMM reads 2·00A
[3·00, 1·00] ± 0·02A. Adjust VR7/107 (measured output current) until the Amps display matches
the DMM reading.
Reduce load until the CC LED is ON. Adjust VR4/104 (maximum output current) until the Amps
display shows 2·05 [3·34, 1·13].
Voltage Regulation
Connect the DMM (set to Volts) across the output, no load, output ON.
Adjust voltage controls for a reading of 18.xxxx on the DMM; note exact reading.
Connect load, set current control to maximum and adjust load for 2A [3A, 1A] output current.
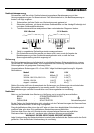
Note that the DMM should be connected at the ‘back’ of the output terminals, closest to the
internal sense connection, and the load plugged in to the 4mm sockets of the terminals. Adjust
VR9/109 (differential voltage gain) until the external DMM matches the previous reading exactly.
1·5V/5V Output
Connect the DMM to the output. Use the front panel control to adjust the output to 5.0x Volts.
With the right-hand Main output OFF, press the SHOW AUX PRESET button to display the AUX
OUT voltage; adjust VR1 on the 1.5V/5V pcb until the display reads 5.0V.
Relay Changeover Voltage Check (not XPL30-1)
With no load connected set the output voltage to approximately 12V. Increase the voltage
gradually and check that the relay changeover occurs (audible click) at between 14·0V and 14·5V
[10·3/10·9V, 25·9/26·7V].
After the relay has changed over reduce the voltage gradually and check that the relay changes
back at between 13·3V and 13·9V [9·7/10·3V, 24·6/25·4V].
Maintenance
The Manufacturers or their agents overseas will provide repair for any unit developing a fault.
Where owners wish to undertake their own maintenance work, this should only be done by skilled
personnel in conjunction with the service manual which may be purchased directly from the
Manufacturers or their agents overseas.
Cleaning
If the PSU requires cleaning use a cloth that is only lightly dampened with water or a mild
detergent. Polish the display window with a soft dry cloth.
WARNING! TO AVOID ELECTRIC SHOCK, OR DAMAGE TO THE PSU, NEVER ALLOW
WATER TO GET INSIDE THE CASE. TO AVOID DAMAGE TO THE CASE OR DISPLAY
WINDOW NEVER CLEAN WITH SOLVENTS.
11