


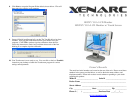

Install the Touch Screen Driver for Microsoft Windows XP:
Here is a simple walk through of Windows XP Touch Driver Installation for
1020TSV. You can skip this step if you have the 1020YV.
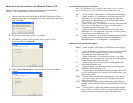
1. Click on Start, Run, and Enter D:\Driver\Win2000_XP\Setup.exe (Please
change the drive letter corresponding to the drive containing the installation
CD). Click OK.
2. The Install Wizard window appears. Click Next.
3. Click Next to continue. Please leave the check box next to “PS2
Touchscreen Driver” unchecked.
4. Select Next system boot up for 4-Point Calibration and click on Next to
continue.
External Buttons, Hot keys description:
Note1: The OSD Menu is only available when a video source is present.
Note2: The Hot keys are only available while the OSD menu is off.
“M” – Stands for Menu. This button is for OSD menu on/off toggling.
“S” – Stands for Select. Use this button to scroll the menu when the
OSD menu is on. Use this button as a hot key to switch video
channel directly when OSD menu is off, following this rotation:
VGA ->Video1 -> Video2 ->VGA.
“/\” – Stands for Increase. Use this button to increase value while OSD
menu is on. Use this button as a hot key to increase speaker
volume directly when OSD menu is off.
“\/” – Stands for Decrease. Use this button to decrease value while
OSD menu is on. Use this button as a hot key to decrease speaker
volume directly when OSD menu is off.
“D” – Stands for Dimmer. Use this button to quickly dim the backlight
for night time use, following this rotation: Full Brightness ->
Medium Brightness -> Low Brightness -> Full Brightness.
Remote Control functions Description:
“Menu” – Stands for Menu. This button is for OSD menu on/off toggling.
“
“+” – Stands for Increase. Use this button to increase value while OSD
menu is on. Use this button as a hot key to increase speaker
volume directly when OSD menu is off.
“–” – Stands for Decrease. Use this button to decrease value while
OSD menu is on. Use this button as a hot key to decrease speaker
volume directly when OSD menu is off.
“/\” – Stands for Up. Use this button to Scroll up through the OSD
menu while OSD menu is on.
“\/” – Stands for Down. Use this button to Scroll down through the
OSD menu while OSD menu is on.
“PIP” – Use this button to enable Picture In Picture function. Press once
for AV1 in PIP window, press twice for AV2 in PIP window, press
again to turn off PIP.
“POP” – Use this button to enable Split Screen function. Press once for
AV1 in Split Screen, press twice for AV2 in Split Screen, press
again to turn off PIP.
“YES” – Use this button in PIP or Split Screen mode to switch between
the three modes: Small PIP Window, Large PIP Window, and Split
Screen.
“Scan” – Use this button to switch video channel, following this rotation:
VGA ->Video1 -> Video2 ->VGA. Pressing this button in PIP or
Split Screen mode will change the input of the main screen.