


3
10/2004
Routine Maintenance:
Cartridges
1. From the Main Menu, select Utility Menu/Prime
Menu/Clean.
2. Select the appropriate cartridge and press OK.
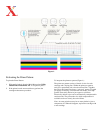
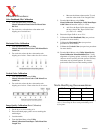
3. Print the prime pattern. The Vacuum Prime feature can be
used if more thorough cleaning is required. Print the
prime pattern again.
4. If further cleaning is needed, remove the cartridge from
the carriage. Dampen a lint-free cloth with distilled water.
Note: If you remove the cartridge from the carriage, a
recalibration will be required.
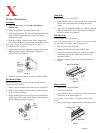
5. Clean all ink residue by wiping the carriage bottom edges.
Blot the jet plate surface. Thoroughly wipe the rear
electrical contacts. (Figure 2.)
Figure 2.
6. Clean the flex driver cable to prevent ink residue transfer.
Flex Driver Cables
Note: Perform every 75 plot hours. (Utility Menu>Display
Status to check plot hours.)
1. Remove power from the printer and lower the air plenum.
2. Remove the cartridges from the carriage. Stand cartridges
on end to prevent leakage.
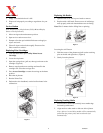
3. Apply distilled water to a lint-free pad and wipe the entire
surface area of each cable. Allow cables to dry completely
before installing cartridges. (Figure 3)
Figure 3
Slide Shaft
Note: Perform every 40 plot hours.
1. Apply distilled water to a lint-free pad and wipe the entire
surface area of the slide shaft, including the service
station.
2. Apply Xerox Film Remover (8R27) to a lint-free pad and
wipe the entire surface area of the slide shaft, including
the service station a second time.
Encoder Strip
Note: Perform every 20 plot hours.
Note: The encoder strip is a clear plastic strip located behind
the shaft under the trailing cable shelf.(Figure 4)
1. Remove power from the printer.
2. Dampen an industrial swab with distilled water.
3. Clean the top and bottom surfaces of the entire length of
the encoder strip. Several swabs may be necessary to
completely clean it
4. Perform a second cleaning using Xerox Film Remover
(8R27).
Figure 4
Platen Surface
1. Remove power from the printer
2. Lower the air plenum.
3. Apply distilled water to a lint-free pad and wipe the entire
surface area of the platen (Figure 5).
Note: Ensure no ink residue or cloth fibers remain on the
platen.
4. Allow platen to dry completely before reinstalling media.
Figure 5