


4
10/2004
Waste Bottle
1. Empty waste bottle before it is full.
2. Dispose of ink properly according to regulations for your
area.
Service Station
Note: Perform every 40 plot hours.(Utility Menu>Display
Status to check plot hours.)
1. Move carriage to the maintenance position.
2. Open service station access door.
3. Dampen a lint-free pad with distilled water and apply to
wipers and seals.
4. Clean all wipers and seals thoroughly. Ensure no lint
fibers remain on surfaces.
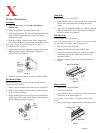
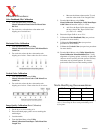
Replacing Print Cartridges
1. From the Main Menu press Utility Menu/Access
Cartridge.
2. Lower the air plenum.
3. Open the carriage door (pull out, then up) and remove the
cartridge. (Figure 6)
4. Remove tape from the new cartridge and install in the
cartridge stall. Close the carriage door.
5. Press Access Cartridge to return the carriage to the home
position.
6. Raise the air plenum.
7. Run the Prime Test.
8. Perform the color deadband, vertical and horizontal color
calibrations.
Figure 6
Replacing Ink Bottles
1. Open the left cover. Pull up on a bottle to remove.
2. Replace with a full bottle. Ensure reservoir ink fittings
mate properly with each intermediate reservoir fitting.
Note: Wait 5 minutes before filling lines or printing.
Figure 7
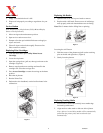
Lowering the Air Plenum
1. Hold the center of the plenum and pull out the retaining
pins on the left and right sides. (Figure 8)
2. Gently lower the plenum.
Figure 8
Replacing/Loading Media
1. Place media on feed roller and fully insert media edge
into media path channel.
2. Align media to white mark on left rear side of platen.
Note: After a 6 second delay media will be automatically
pulled into the printer path, and sensed and sized
automatically.