


PRINTERS
XEROX DOCUPRINT 96/4635/180 NPS SYSTEM OVERVIEW GUIDE 3-5
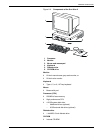
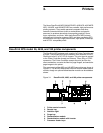
9 Sample button
10 Brightness control thumbwheel
11 Icon area
12 Message area
1. Language icon
If two languages are available for your printer control console,
selecting this icon allows you to choose the language for the
printer control console messages.
2. Printer icon
Select this icon to display the printer mimic. (This is the default
display on the printer control console.)
3. Fault List icon
Select this icon to display the Fault List screen. All active faults
will be listed in order of occurrence.
4. Tools icon
Select this icon to display call for service information and to
adjust display features of the printer control console (for
example, alarm loudness).
5. Guarded Tools icon
This icon is reserved for the service representative and
operators who have completed Advanced Customer Training
(ACT/eXcellerate).
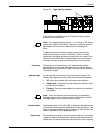
6. Clear button
Select this button to clear fault messages.
7. Continue button
Press this button to resume printing.
8. Stop button
Press this button to stop printing.
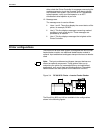
9. Sample button
The Sample button on the 180, 4635, or 96 printer will duplicate
one of the sheets in the paper path and deliver it to the sample
tray. This sheet can be used to check quality and alignment
while printing. The button is disabled for MICR models.
10. Brightness control thumbwheel
Use this thumbwheel to adjust the brightness of the printer
control console display.
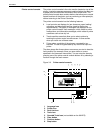
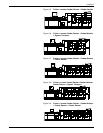
11. Icons
Area where the following icons appear:
Fault icon. This icon appears when a fault exists in the system
that stops the printer or prevents it from printing.
Hint icon. This icon appears when a masked fault or condition
exists in the printer. See “Fault masking and the printer control
console” in the Guide to Troubleshooting.
ACT/eXcellerate icon. This icon appears when a maintenance
task requiring an ACT/eXcellerate trained operator must be
done. If you have successfully completed ACT/eXcellerate,